What Ledger does
Ledger brings the daily records of a small business together: what customers bought, what they owe, what suppliers billed, what stock is available, and how individual jobs performed. General Ledger provides the company accounting record behind those activities.
Begin with the areas your business uses. A service business can invoice work without maintaining physical stock. A business that sells goods can also use purchase orders, receiving, stock locations, and inventory reports. Divisions and departments provide reporting groups within a company; separate companies use separate databases.
| Area | What it helps you do |
|---|---|
| Main Console | Confirm the company and accounting date, open working areas, maintain setup, and review a company snapshot. |
| General Ledger | Review and post balanced batches, inspect account activity, reconcile bank accounts, and produce financial reports. |
| Receivables | Prepare customer invoices, record and apply payments, investigate customer history, and review unpaid balances. |
| Payables | Enter supplier bills and credits, prepare payments, print or record checks, and review vendor activity. |
| Inventory and Purchasing | Order goods, record deliveries, follow shortages, move stock, and review quantities and values. |
| Jobs | Follow the recorded income and costs of a project, with references back to its business activity. |
| Contacts | Keep business contacts, groups, notes, and follow-up history together. |
The editions
LedgerSL is the SQLite edition. It uses a local company database file and is intended for one active user per company at a time. The standard Linux application is free and fully functional. The word Demo on a database choice refers to fictional sample company data.
LedgerPG uses PostgreSQL. Its connection, server administration, backup, and deployment differ from SL. Use the server and company prepared by your administrator. The shared workflows in this manual include edition notes where the documented forms differ; use the instructions appropriate to your installed build.
The screenshots show LedgerSL. Window colors and the appearance of buttons or text links can vary with the desktop theme and application version. The screenshots explain the working areas; their sample balances are not expected results for your own company.
How the records connect
A customer invoice describes a sale; a customer payment settles the amount due. A purchase order describes an order to a supplier; a goods receipt records delivery; a supplier invoice records the bill. These are separate records because ordering, delivery, billing, and payment often happen on different dates.
Posting a source document and posting its generated GL batch are also separate stages. Check each stage using its status and reference. A printed document or a changed customer balance alone is not proof that all posting is complete.
Start here: your everyday guide
You do not need to be an accountant to follow this guide. Each main entry task explains what to have ready, what to enter, how to check your work, and what happens next.
Ledger means the shared accounting application in this guide. It covers LedgerSL (SQLite) and LedgerPG (PostgreSQL). Your window title may show either name. Instructions apply to both unless a note names an edition. Button appearance can differ between versions and between light and dark themes.
What do you want to do?
| Your task | Go to |
|---|---|
| Bill a customer for goods or work | AR invoice entry |
| Record a bill from a supplier | AP invoice entry |
| Order goods from a supplier | Purchase orders |
| Record a delivery of goods | Purchase order receipts |
| Record a customer's payment | Customer payments / money received |
| Track the income and costs of a project | Set up and track a job |
| Keep stock in one warehouse or several places | Inventory locations: start with WHSE |
Before entering real transactions
- Check the company name. Make sure you opened the company you intend to work on.
- Check the accounting date. Ledger uses this date as a starting value on several screens. A payment can use it even when there is no separate date box on the payment form.
- Use the demo for practice. The default sample data is for demonstration only. It represents one company with different locations. The LedgerSL demo package also provides an otherwise empty company database containing only the minimum setup data for starting another company. Complete and check that setup before entering real business activity. For LedgerPG, use the practice or new-company database prepared for you by your administrator.
- Have the basic setup completed. Your company needs its accounts, posting accounts, periods, taxes where applicable, and bank accounts. Your company administrator or bookkeeper should select these values; once configured, you normally choose them from lists.
- Use meaningful descriptions. “Oak Street shelves — installation” is easier to trace later than “work.” Keep the invoice, PO, delivery note, and payment references with your records.
How to use this help
Choose a topic in the contents or press Ctrl+F in your browser to find a word or document number. The installed HTML file can be read without an Internet connection. Where your application has help connected, F1 or its Help button opens the relevant topic. You can also open Help/index.html directly. Use the browser's Print command if you want a paper copy.
A few useful words, in plain language
| Word on the screen | What it means for your work |
|---|---|
| AR — Accounts Receivable | Customer invoices and the money customers owe your business. |
| AP — Accounts Payable | Supplier bills and the money your business owes suppliers. A supplier is also called a vendor. |
| Invoice / credit memo | An invoice records a charge. A credit memo reduces a charge, for example an agreed price correction. Recording a credit does not by itself record a cash refund. |
| PO — Purchase order | Your request to a supplier for goods or services. It is not the supplier's invoice and does not prove that goods arrived. |
| Receipt | In Purchasing, a record of goods received. In a customer-payment discussion, money received. These are separate tasks. |
| GL — General Ledger / account | The company's main accounting record. An account is a category such as Sales, Office Supplies, or the bank account. Choose the category set up for the transaction. |
| Subledger / control account | A detailed record for an area such as customers or suppliers, and its corresponding summary account in General Ledger. Reconciliation checks that the detail agrees with the summary. |
| Debit / credit | The two sides of an accounting entry. Their effect depends on the account category. Normal invoice and receipt posting creates these entries from your setup; you do not need to type them into each customer invoice. |
| Distribution | The AP invoice lines that explain what a bill is for. A bill for 150.00 might be split into 100.00 for supplies and 50.00 for another category. |
| Period / year | The accounting month or other period set up for the transaction date. Do not change the date merely to force an entry into an open period. |
| Batch | A group of accounting entries waiting for review or already posted in General Ledger. |
| On hand / allocated / available | Stock recorded at a location; stock committed to orders; and stock left after those commitments. Available = On hand − Allocated. |
| UOM — Unit of measure | How one unit is counted, for example EA for each or BOX for a box. Use the same unit when ordering, receiving, and selling an item. |
| RNI — Received Not Invoiced | A temporary accounting category for goods already received whose supplier bill has not yet cleared that amount. |
| Reconcile / aging | Reconcile means compare two records and explain differences. Aging groups unpaid invoices by how old they are. |
Save, print, and post are different steps
| Action | What to expect |
|---|---|
| Save an invoice or PO | Stores the document for further work. Saving alone does not finish its posting workflow. Saved customer orders can reserve stock. |
| Print / confirm Printed | Produces or reviews a document and records its printed status where prompted. Printed status is required by the AR invoice and PO posting workflows. Printing alone does not post. |
| Post a PO | Makes an eligible printed PO read-only and available for receiving. Does not add stock or create a GL batch. |
| Post an invoice or inventory receipt | Finalizes that operational transaction and creates a GL batch for review where required. The GL batch can still be unposted. |
| Post the GL batch | Completes the General Ledger stage. Use the source reference to check the batch before posting. |
| Save a customer payment | Stores its applications and can already reduce the invoice balance shown in AR. Payment posting and GL review are still required. A lower balance alone does not prove that posting is complete. |
Hold means “do not post this yet.” Use it while information is missing, then remove it after checking the document. If a posting window reports several eligible documents, review the whole group before confirming; posting is not always limited to the row you last selected.
Install LedgerSL on Linux
These instructions cover the October 4, 2026 Linux package, version 2026.10.04-1. It is intended for Linux Mint 22.x and Ubuntu 24.04 desktop on a 64-bit Intel or AMD computer. This package is not for ARM, Windows, or macOS. Later releases may have a different filename; follow the matching download instructions.
You do not need Lazarus, Free Pascal, or a separate database server to run the compiled application. The package installer obtains missing runtime libraries from your configured repositories; that step needs Internet access when libraries must be downloaded.
- Download the Linux .deb from www.ledgersl.com/downloads.
- On Mint, double-click the file and use Package Installer. Alternatively, open a terminal in the download folder and run the command below.
-
Open LedgerSL from the application menu, or run
ledgerslin a terminal. - Run the application as your normal desktop user. Administrator permission is for installing the package; do not run everyday accounting with sudo.
sudo apt install ./ledgersl_2026.10.04-1_amd64.deb
Choose the sample company
At LedgerSL First Start, choose Open Demo Company. If you need to select it manually, choose Browse for Database... and open the following file in your home folder:
~/.local/share/LedgerSL/data/LedgerSL_Demo.db
The tilde means your own home folder. Press Ctrl+H in the file chooser to show hidden folders, then open .local, share, LedgerSL, and data. Select the writable home-folder copy, rather than the system package under /usr/lib/ledgersl.
If a previous company opens directly, choose Company > Change Company. Follow the restart prompt. LedgerSL remembers the selected database for later launches.
Set the password and sign in
A fresh sample company has the administrator user name Demo. When prompted, choose and confirm your own password of at least eight characters. The message may say Application security has been upgraded; this is expected for the new sample copy. At Accounting Login, enter Demo and the password you chose. There is no shared default password.
An application update preserves the login and password already stored in an existing company. If you already used that database, use its existing credentials.
Explore the sample year
The sample has fictional activity throughout 2026, including dates later than the package release date. For a full-year review, choose December 31, 2026 as the accounting date and January 1 through December 31, 2026 on reports. Select all divisions for the whole company.
- Confirm the sample company and database path.
- Open the Main Console and review the snapshot.
- Open a customer invoice and compare it with customer history.
- Inspect stock by location and a purchase order.
- Preview a GL report, then close and reopen the application to confirm that the company choice is remembered.
Use the sample for learning. Create a separately named company database before entering your own business records; the next chapter explains that process.
Update an existing installation
Finish and save your work, back up the company, and close LedgerSL before installing an update. Install the newer .deb in the same way. Existing databases, passwords, grid preferences, and the saved company selection are preserved. An updated sample does not overwrite the sample database you already have.
For an earlier ZIP installation, run ledgersl once from a terminal after
installing the .deb to update its managed launcher. If startup reports missing runtime
libraries, run ledgersl --check and retain the exact message for support.
Where LedgerSL keeps files
The application creates personal settings as needed. There is no INI file you must configure by hand before the first login. Custom company databases stay in the folder chosen when they were created or selected.
| Purpose | Normal location |
|---|---|
| System package | /usr/lib/ledgersl |
| Writable application | ~/.local/share/LedgerSL/current/TheLedger |
| Sample company | ~/.local/share/LedgerSL/data/LedgerSL_Demo.db |
| Clean template | ~/.local/share/LedgerSL/data/LedgerSL_Empty.db |
| Installed offline help | ~/.local/share/LedgerSL/current/Help/index.html |
| Personal settings | ~/.config/TheLedger/TheLedger.ini |
| Grid preferences | ~/.config/TheLedger/GridSize.ini |
The Statistics Dashboard also uses GridSize.ini beside the executable. Use Help > Support Information to check the actual database and settings locations for your installation. Moving an INI file does not move the company's accounting records.
LedgerSL_Empty.db is a reusable template. Create your own company through Change Company; do not open the template directly as the working company.
Open the right company: SL and PG differences
Before entering data, confirm the company name. Changing the company connection changes which business records you work on.
LedgerSL — SQLite company file
Open Company > Change Company from the top-left menu as an administrator. Use Open Selected for a recent company, Browse for Database... for an existing company file, or Open Demo Company for practice.
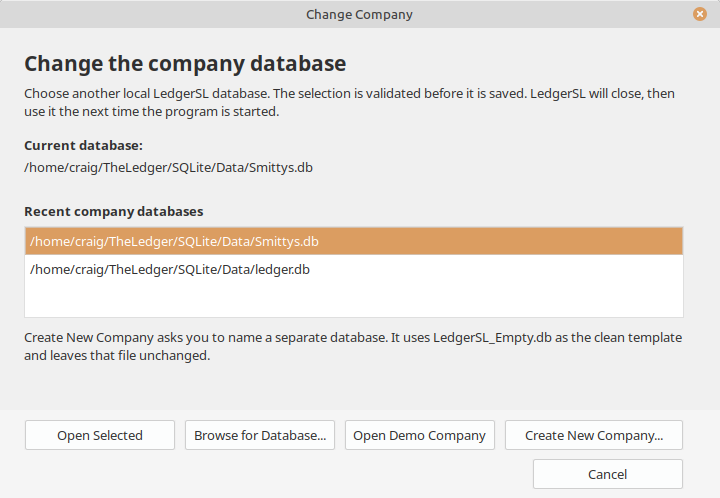
Create a separate company database
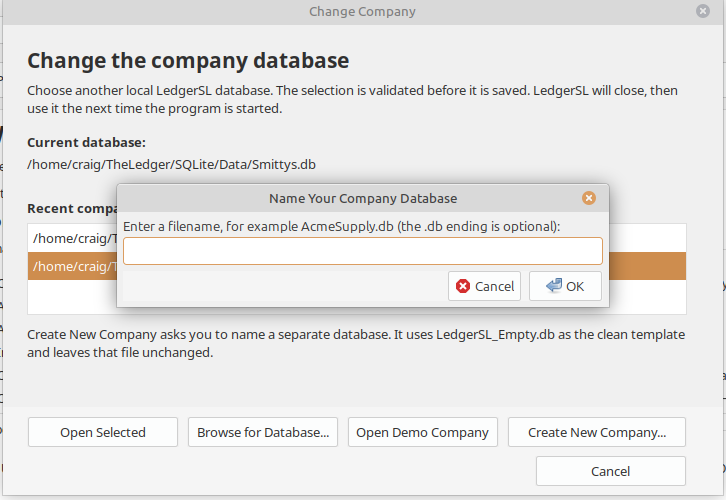
- Choose Create New Company.... The installed clean template supplies the starting database.
-
At Name Your Company Database, enter a recognizable filename such as
AcmeSupply.db. LedgerSL adds
.dbif you leave it off. -
Choose a local folder in the Save dialog. LedgerSL refuses existing files, invalid
filenames, and reserved template names such as
LedgerSL_Empty.db,LedgerSL_Clean.db, andledger_empty.db. Choose your own filename; the template is not your working company. - LedgerSL creates and checks the new copy. Restart the application to use the selected company database.
- Check the company and full file path, then run Company > Company Setup Wizard to update that company's details and basic setup.
Each business needs its own company file and backups. Keep practice transactions in the demo company. Existing company files are not automatically renamed by this change. The current chooser hides missing recent files and template files; use Browse for Database if a working company has moved.
LedgerPG — PostgreSQL connection
LedgerPG connects to a PostgreSQL database. Use the connection and company supplied by your administrator. A SQLite file path is not a PostgreSQL connection, and a LedgerSL company file cannot simply be renamed to become a LedgerPG database. Ask your administrator to handle a database move or conversion.
See Database Information when confirming the active database for support. Installing a help update does not change your database connection or migrate company data.
Company Setup
Maintain the company record and core setup required before normal processing. Complete the Chart of Accounts and Posting Account Setup before relying on automatic posting.
LedgerSL: Company Setup Wizard
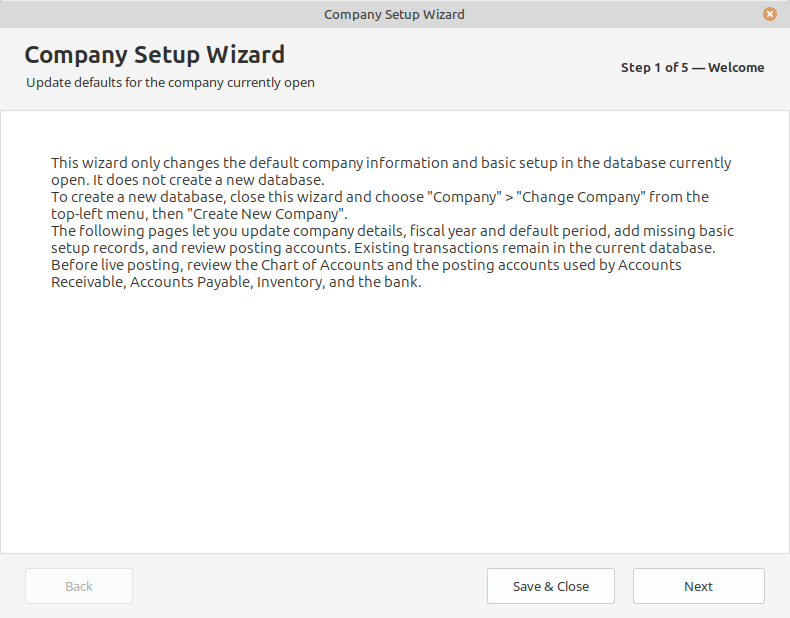
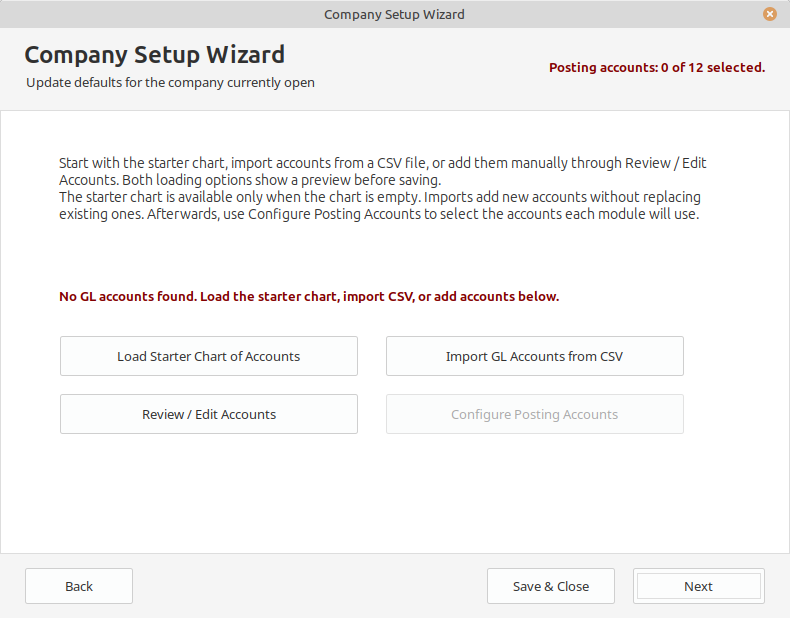
Sign in as an administrator. On the Main Console, open the top-left Company menu and choose Company Setup Wizard. Change Company and the wizard are now menu items rather than permanent buttons. The company name appears above the Main Console title.
- Verify the current company and database path.
- Review the company name and address, fiscal information, starter identifiers, and periods.
- At Step 4: GL Accounts, choose Load Starter Chart of Accounts, Import GL Accounts from CSV, or Review / Edit Accounts.
- After accounts exist, use Configure Posting Accounts to select the accounts used by automatic posting.
- Review the remaining setup and opening information before entering live transactions.
Follow the starter chart and CSV import instructions. These revised setup options require a LedgerSL build that includes them. Installing this guide does not add them to an older application.
For example, a simple company might use Division MAIN, Department GENERAL, Product Class GENERAL, and one normal inventory Location. More can be added later when separate reporting or operational tracking becomes useful.
See Optional Setup Identifiers for more guidance.
Start with a simple company structure
A small single-location business can start with one business location (a Division) and one general Department. Set each division up separately when you want to track sales and expenses for different branches or operating areas. You can review each division or the company as a whole using the available report filters.
| Setup | One-location example | Purpose |
|---|---|---|
| Division | MAIN — Main business | Which business location or operating area owns the activity. |
| Department | GENERAL | A further grouping within your business, if needed. |
| Product class | GENERAL | A category for grouping inventory items. |
| Inventory location | WHSE — Warehouse | Where physical stock is kept. Enter this on receipts and other stock movements. |
| Job | Oak Street — shelf installation | One project whose income and costs you want to follow. |
A division and an inventory location are separate values. For example, Division MAIN can own stock stored at WHSE and VAN1. Choosing MAIN on an invoice does not choose its stock location for you.
- Decide which reporting groups you need now. One division and one department are enough for a simple business.
- Enter those records through Divisions and Departments, then select your normal defaults.
- Choose a short stock-location name such as WHSE and use that spelling consistently. Follow Inventory location setup; stock locations are established through stock transactions, not through the division list.
- Check the division, department, and stock location when entering each transaction. Defaults save typing but still need checking.
- Add more groups when the separate information will be useful. Existing transactions are not automatically redistributed just because a new group is added.
Company Defaults
Maintain company-wide defaults used throughout Ledger.
LedgerSL: starter Chart of Accounts and CSV import
Open Company > Company Setup Wizard > Step 4: GL Accounts as an administrator. Save or cancel unfinished edits before importing, and verify the active company.
Load a starter chart
Choose Load Starter Chart of Accounts to preview 36 common accounts, then confirm to add them. This option is available only when the chart is empty. The starter is editable: all accounts begin active, without parent links, notes, balances, or automatic posting assignments. Review it for your business before configuring posting accounts.
Prepare a CSV file
Export accounts from the previous system, or use Save CSV Template in the import window. You can also download the three-account CSV template or the 36-account starter chart. Replace example rows with your own accounts. Save as UTF-8, comma-separated CSV; export .xlsx or other spreadsheet formats to CSV first.
| Column | Required? | Value |
|---|---|---|
AccountNumber |
Yes | Text, up to 20 characters. Set the spreadsheet column to Text before entering numbers with leading zeros. |
Description |
Yes | Account name, up to 60 characters. |
Type |
Yes | Asset, Liability, Revenue, Expense, or Equity. |
Class |
Yes | Revenue, Cost of Sales, Operating, or Other. |
Category |
Yes | Current, Long Term, or Other. |
ParentAccount |
No | A top-level parent account number in the current chart or the same file. Blank means top-level. |
Suspended |
No | True/False, Yes/No, or 1/0. Blank means False (active). |
Notes |
No | Up to 40 characters. |
The first five columns are required; optional columns may be blank or omitted. Header order can vary. Spaces and underscores in names are accepted, such as Account Number. Remove unsupported columns; there is no field-mapping screen. Quote fields containing commas, quotes, or line breaks using normal CSV rules. UTF-8 files with or without a byte-order mark are accepted. Limit a file to 10,000 accounts and 5 MB.
Existing LedgerSL export values
Database-style headers are also accepted: AcctNumber,
AcctDescription, AcctType, AcctClass,
AcctCat, AcctParent, AcctSuspended, and
AcctNotes.
| Field | Numeric values accepted |
|---|---|
| Type | 1 Asset; 2 Liability; 3 Revenue; 4 Expense; 5 Equity |
| Class | 1 Revenue; 2 Cost of Sales; 3 Operating; 4 Other |
| Category | 1 Current; 2 Long Term; 3 Other |
Choose these classifications explicitly. The importer does not guess them from account numbers.
Preview and correct
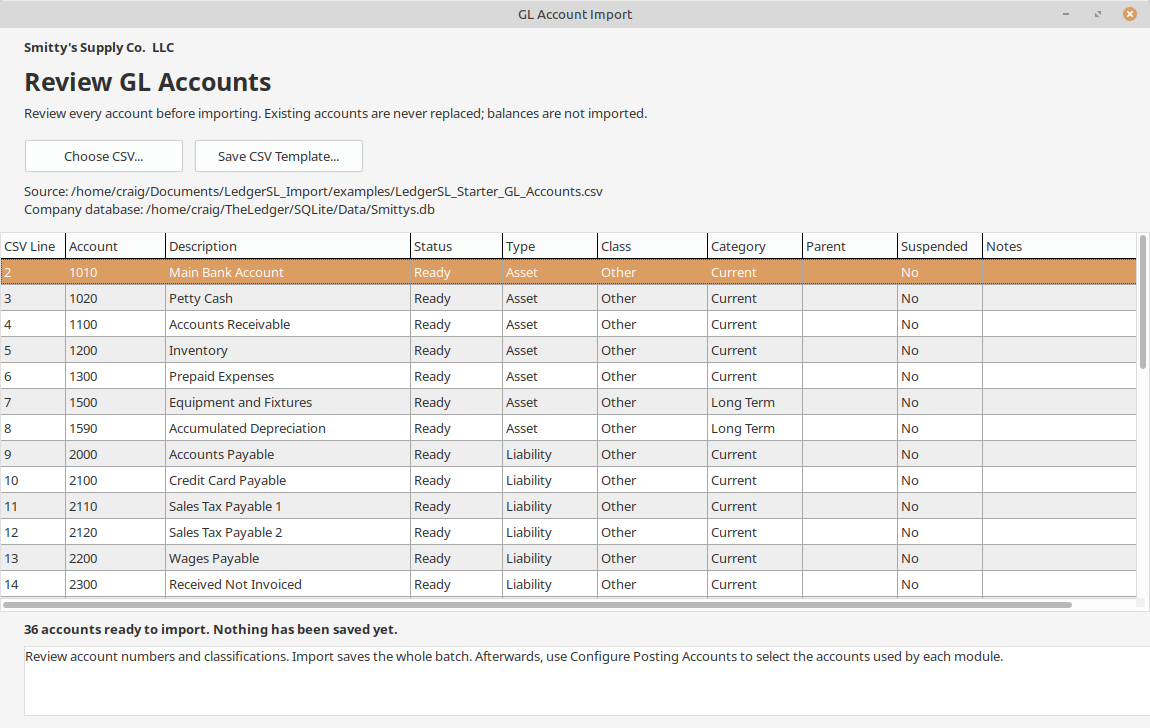
- Choose Import GL Accounts from CSV, then Choose CSV.
- Review the list, classifications, and Status column. Rows with errors show an exclamation mark beside the CSV line number. Select a row to read the full message below the grid; scroll horizontally to see all fields.
- The preview is read-only. Correct errors in the source CSV, save it, and choose the file again. Import Accounts is disabled until every row is valid.
- Choose Import Accounts, then confirm the company and account count. The chart is checked again before saving. The batch is saved together; an insert failure rolls back that batch. Cancelling or closing the preview saves nothing.
- Use Review / Edit Accounts to inspect the saved chart. Then use Configure Posting Accounts for the accounts used by automatic posting.
Common validation messages
- Duplicate account: account numbers must be unique in the CSV and cannot already exist in the company chart. Surrounding spaces and ASCII letter case do not make a different number. Existing accounts are never updated or overwritten.
- Invalid classification or column: use supported values and headers from the tables above. Remove unrelated export columns.
- Invalid parent: the parent must exist in the chart or anywhere in the same CSV. It must be top-level and have the same Type as its child. An account cannot parent itself or use another child as its parent. An active child cannot be beneath a suspended parent. An existing account with journal activity cannot become a parent.
Posting Account Setup
Posting Account Setup tells the accounting modules which General Ledger accounts to use for control accounts and shared posting defaults. The selections display account numbers and descriptions, while the setup record stores the underlying GL account identifiers.
Accounts Payable tab
| Setting | Purpose |
|---|---|
| Accounts Payable control | The liability control account used for vendor invoices, credits, and payments. |
| Purchase discounts | Records AP purchase discounts when the payment workflow uses them. |
| AP adjustments | Records approved AP payment adjustments where applicable. |
Accounts Receivable tab
| Setting | Purpose |
|---|---|
| Accounts Receivable control | The asset control account used for customer invoices, credits, and payments. |
| Sales discounts | Records customer-payment discounts. |
| Sales tax 1 payable | Liability account for the first sales-tax authority. |
| Sales tax 2 payable | Liability account for the second sales-tax authority when used. |
Inventory / Purchasing tab
| Setting | Purpose |
|---|---|
| Inventory control | The inventory asset account used by inventory transactions. |
| Cost of sales | The expense/cost account used when inventory is sold. |
| Received Not Invoiced | Temporary liability/clearing account used between receiving inventory and recording the related vendor invoice. |
| Purchase Price Variance | Records approved differences between receipt cost and vendor invoice cost. |
GL / Common tab
Default bank account is the normal cash-account choice used by shared workflows that need a default bank/deposit account. Manual GL journals themselves are not tied to a single control account.
Validate and Save
- Review each tab and make sure the selected account matches its accounting role.
- Choose Validate to check the configuration.
- Correct missing, suspended, or inappropriate selections reported by validation.
- Choose Save only when the configuration is ready for future posting.
Back to General Ledger Console | Chart of Accounts | Back to Help contents
Posting accounts: quick reference
Posting Account Setup tells Ledger which GL accounts to use automatically when a source module creates accounting entries. These defaults reduce repetitive account selection and, more importantly, keep postings consistent.
| Area | Examples |
|---|---|
| Accounts Receivable | AR Control, sales/revenue defaults, discounts, and normal deposit/bank account. |
| Accounts Payable | AP Control, purchase discount, and normal bank/cash account. |
| Inventory / Purchasing | Inventory Control, Cost of Sales, and Received Not Invoiced. |
| GL / Common | Shared bank/default cash-account choices used by common workflows. |
Divisions and Departments
Maintain the organizational dimensions used to classify GL and source-module activity.
If the company does not need separate divisions or departments, do not create artificial complexity. One Division such as MAIN and one Department such as GENERAL are sufficient for a simple setup. Additional entries can be added later when separate tracking or reporting is needed.
Users
Maintain Ledger users and access/security settings.
Terms
Maintain payment terms, due days, discount days, and discount percentages used on customer/vendor documents.
Tax Setup
Maintain sales-tax configuration used by customer invoicing.
Numbering Defaults
Numbering Defaults controls the next user-facing document numbers used by Ledger. Current sequences include customer invoices and quotes, purchase orders, receipts, check-register documents, jobs, and GL batches.
Numbering safeguards
- Next numbers must remain positive.
- A sequence may be moved forward when necessary, but should not be moved backward into numbers that may already exist.
- Invoice, PO, and GL-batch sequences are protected against reusing an existing high-water number.
- Where the document allocator is transactional, cancelling before a successful save does not consume the offered number.
Classifications and Units of Measure
The Classifications area maintains reusable lists that keep item and customer setup consistent. Current maintenance includes Units of Measure and classification lists used by Inventory and customer records.
Units of Measure (UOM)
Create short, recognizable units such as EA, BOX, FT, or HR. Item Maintenance uses the UOM list rather than requiring users to type a different spelling each time.
Classification lists
Use product and customer classifications to group similar records for searching, reporting, pricing, or operational review. Prefer a small set of meaningful categories over several nearly identical descriptions.
Sales People
Use Sales People to maintain the salesperson names available to customer and sales workflows. Keep the list current so new transactions can be assigned consistently and sales reports do not split one person across multiple spellings.
Main Console
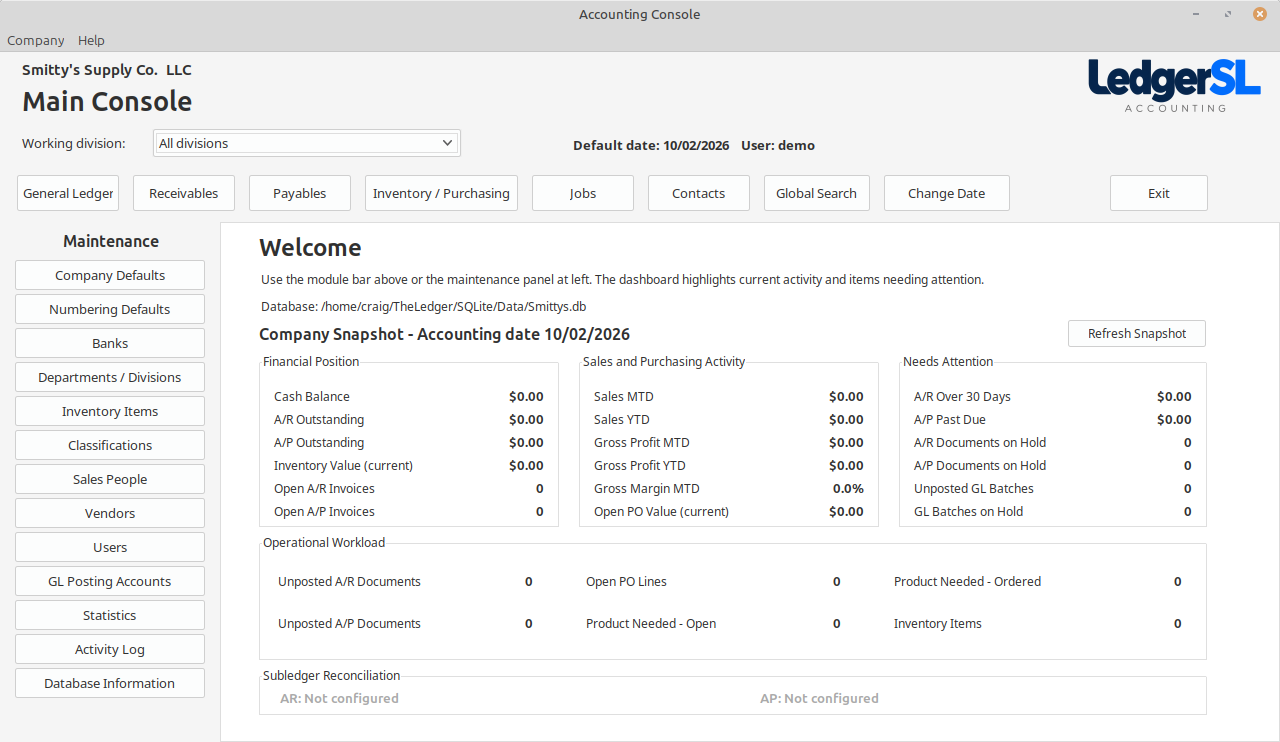
The Main Console is the starting point for Ledger. From here you can open the major accounting areas, maintain company setup information, and review a quick snapshot of the company after you log in.
Before you begin: Company, User, and Accounting Date
| Item | What it means |
|---|---|
| Company | The company whose accounting records are currently open. Verify this before entering transactions. |
| User | The person currently signed in. Access to modules and maintenance functions depends on that user's permissions. |
| Default Date | The accounting date Ledger normally uses for transaction entry and for the dated portions of the Company Snapshot. It does not have to be today's calendar date. For example, while finishing July work in August, you may set the date to July 31. |
| Change Date | Changes the accounting date. The snapshot is recalculated for the newly selected date. |
| Home | Returns to the Home page and refreshes the Company Snapshot. |
Main accounting buttons
| Button | Use |
|---|---|
| General Ledger | Opens the central accounting record. Transactions from Accounts Receivable, Accounts Payable, Inventory, and manual journal entries ultimately affect General Ledger accounts. |
| Accounts Receivable | Customer accounting: invoices, customer payments, aging, sales information, and reports. Receivable means money customers owe your company. |
| Accounts Payable | Vendor accounting: vendor invoices, payments, credits, aging, and reports. Payable means money your company owes vendors. |
| Inventory / Purchasing | Inventory items, purchase orders, receiving, Product Needed, transfers, adjustments, and purchasing reports. |
| Jobs | Job Costing for tracking income and costs associated with individual jobs or projects. |
| Contacts | Companies, people, groups, and contact activity. |
| Close or Exit | Closes Ledger. |
Maintenance buttons
Maintenance areas define how Ledger works. Some are restricted to users with administrative or setup permissions.
| Button | Use |
|---|---|
| Company Defaults | Company name, address, contact information, and company-wide settings. |
| Numbering Defaults | Controls the next document numbers used for invoices, purchase orders, GL batches, and other numbered transactions. |
| Banks | Defines company bank accounts and their General Ledger account connections. |
| Departments / Divisions | Defines organizational divisions, locations, and departments used to separate and report accounting activity. |
| Inventory Items | Adds, reviews, and edits products and services used by Inventory, Purchasing, and Order Entry. |
| Classifications / Jobs | Maintains classifications and job-related setup categories. |
| Sales People | Maintains salespeople used on customer activity and reporting. |
| Vendors | Adds and maintains companies from which you purchase goods or services. |
| Users | Maintains users, passwords, permissions, and access rights. |
| GL Posting Accounts | Defines the General Ledger accounts used automatically when other modules create accounting entries. Change these only when you understand the company's chart of accounts. |
| Activity Log | Shows an audit history of significant activity performed in Ledger. |
| Database Information | Shows information about the database and its version. |
Company Snapshot
The Company Snapshot is a quick management and workflow view. It is not intended to replace detailed accounting reports.
If a value says Restricted, the signed-in user does not have permission to open the accounting area required to calculate or view it.
Financial Position
| Snapshot item | Meaning |
|---|---|
| Cash Balance | Posted General Ledger activity in the configured cash/bank accounts through the Accounting Date. |
| A/R Outstanding | The net amount customers owe the company through the Accounting Date. A/R means Accounts Receivable. |
| A/P Outstanding | The net amount the company owes vendors through the Accounting Date. A/P means Accounts Payable. |
| Inventory Value (current) | Current product quantity on hand multiplied by standard cost. This is a current-state figure, not a historical inventory valuation. |
| Open A/R Invoices | Number of posted customer invoices dated through the Accounting Date that still have a positive unpaid balance. |
| Open A/P Invoices | Number of posted vendor invoices dated through the Accounting Date that still have a positive unpaid balance. |
Sales and Purchasing Activity
| Snapshot item | Meaning |
|---|---|
| Sales MTD | Posted sales from the first day of the selected month through the Accounting Date. MTD means Month to Date. Sales tax is not included. |
| Sales YTD | Posted sales from the first day of the selected year through the Accounting Date. YTD means Year to Date. |
| Gross Profit MTD / YTD | Sales minus the direct cost of what was sold. Example: sell an item for $100 that cost $60; gross profit is $40. |
| Gross Margin MTD | Gross profit expressed as a percentage of sales. In the $100 sale / $60 cost example, the gross margin is 40%. |
| Open PO Value (current) | Total value of posted Purchase Orders that are still open. PO means Purchase Order. |
Needs Attention
These items do not automatically mean something is wrong. They identify work that may require review. Counts shown in red are meant to attract attention.
| Snapshot item | Meaning |
|---|---|
| A/R Over 30 Days | Posted customer balances from invoices more than 30 days old as of the Accounting Date. |
| A/P Past Due | Posted vendor invoice balances whose due dates are before the Accounting Date. |
| A/R Documents on Hold | Unposted customer documents intentionally prevented from posting. |
| A/P Documents on Hold | Unposted vendor documents intentionally prevented from posting. |
| Unposted GL Batches | General Ledger batches dated through the Accounting Date that have been created but have not been posted. |
| GL Batches on Hold | Unposted GL batches deliberately prevented from posting until reviewed or released. |
Operational Workload
| Snapshot item | Meaning |
|---|---|
| Unposted A/R Documents | Customer documents dated through the Accounting Date that are waiting to be posted. |
| Unposted A/P Documents | Vendor documents dated through the Accounting Date that are waiting to be posted. |
| Open PO Lines | Purchase Order lines for which the ordered quantity has not yet been fully received. |
| Product Needed - Open | Items needed for customer orders that are still in OPEN status and have not yet progressed to an order. |
| Product Needed - Ordered | Needed items that have been placed on a Purchase Order and are still in ORDERED status. |
| Inventory Items | Total number of inventory item records. |
Subledger Reconciliation
A subledger is the detailed accounting behind a General Ledger control account. For example, Accounts Receivable contains the customer-by-customer detail, while the General Ledger contains the overall Accounts Receivable control balance. Those balances should agree.
| Status | Meaning |
|---|---|
| AR: In Balance | Accounts Receivable detail agrees with the posted A/R control-account activity in the General Ledger through the Accounting Date. |
| AP: In Balance | Accounts Payable detail agrees with the posted A/P control-account activity in the General Ledger through the Accounting Date. |
| Variance shown in red | The subledger and the posted General Ledger control activity do not currently agree by the amount shown. |
When you see a red variance:
- Check the General Ledger Console for unposted batches.
- Review any GL batches that are on hold.
- Post the appropriate batches.
- Return to the Accounting Console and click Refresh Snapshot.
- If the variance remains, run the appropriate A/R-to-GL or A/P-to-GL Reconciliation report and investigate the remaining difference.
The Snapshot is interactive
Many dollar amounts and counts on the Company Snapshot are clickable. Click a value to open the General Ledger, Accounts Receivable, Accounts Payable, or Inventory / Purchasing area associated with that number.
What should I check after I log in?
- Verify the Company and Default Date / Accounting Date.
- Look at Needs Attention for overdue balances, holds, and unposted GL work.
- Look at Operational Workload for documents, purchase orders, or Product Needed items waiting for action.
- Check whether A/R and A/P reconciliation show In Balance. If either is red, check unposted GL batches first.
- Use the top module buttons to open the area where you need to work.
- After completing a group of transactions, use Refresh Snapshot for an updated overview.
User Defaults
Maintain user-specific working defaults such as Ledger's accounting/default date.
Statistics Dashboard
The LedgerSL Statistics Dashboard brings sales trends, gross profit, and category comparisons together. Use it to identify a question worth investigating, then compare the figures with the appropriate accounting or operational report.
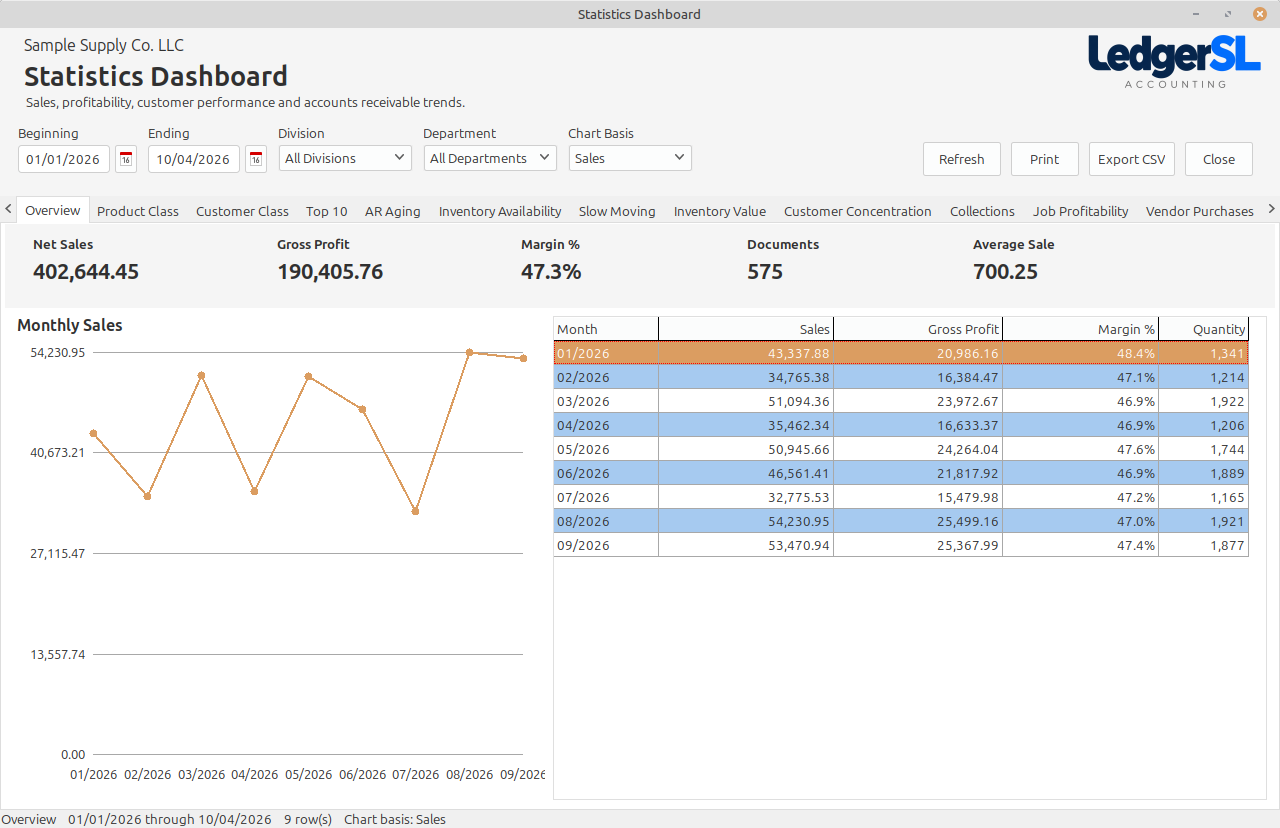
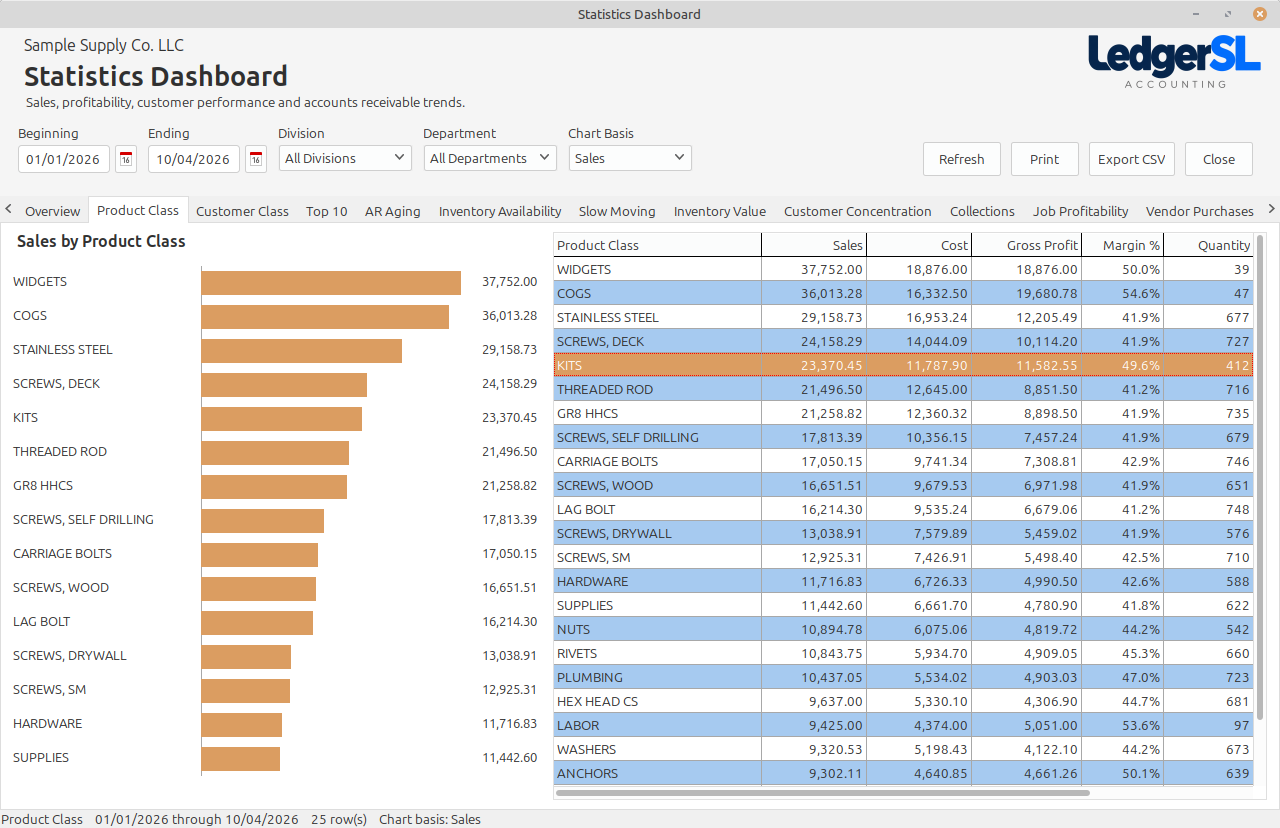
- Choose the date range. Select the division and department, or include the whole company.
- On Overview, review net sales, gross profit, margin, document count, average sale, and the monthly sales trend.
- Use Product Class to compare sales, cost, gross profit, margin, and quantity by category.
- Use the additional tabs for customers, receivables, inventory, collections, job profitability, and vendor purchases.
- Print the result or export CSV when further review is needed.
A chart shows a pattern; the adjoining table supplies the figures behind it. When comparing two reports, match the dates and operating-area filters first. A high sales amount does not by itself mean a high profit or that the customer has paid.
Global Search and the audit trail
LedgerSL Global Search can find records across the application using names, descriptions, document numbers, check or PO numbers, references, phone or email text, and amounts. Results respect the signed-in user's module permissions.
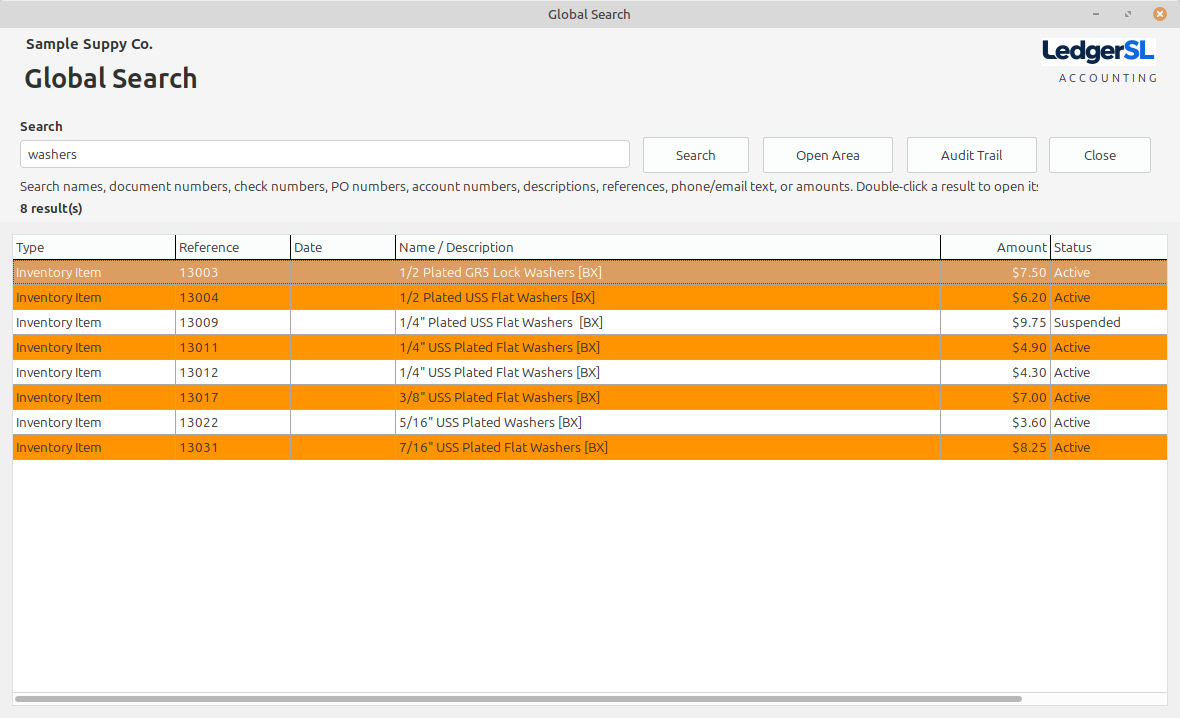
- Enter a recognizable reference or part of a name.
- Check the result's area, description, reference, and amount before choosing it.
- Choose Open Area to continue in the working area that owns the result.
- Choose Audit Trail to review recorded actions for that result, including date and time, user, area, action, reference, and detail.
The audit history explains recorded application activity. It does not replace the invoice, payment, receipt, or GL batch. If an amount is wrong, correct it through the relevant accounting workflow rather than changing history.
Activity Log
Review recorded application activity. The log is an audit aid; it does not replace the accounting transactions themselves.
Database Information: confirm the company database
- Open Database Information from the application's setup/utility area.
- Check the company name and connection status.
- LedgerSL: review the active SQLite database file and displayed database/version details.
- LedgerPG: review the connected PostgreSQL database name and displayed database/server version details.
- When requesting help, include the application edition, displayed version information, and the exact error message. Do not include passwords.
This is an information screen, not a normal data-entry task. For LedgerSL file maintenance, close the application before moving or replacing its company file and use your backup procedure. For LedgerPG, have the database administrator handle server backup/restore; copying a local SQLite file is not a PostgreSQL backup.
General Ledger Console
The General Ledger is the accounting record that brings the rest of Ledger together. Accounts Receivable, Accounts Payable, Inventory/Purchasing, and manual journal entries all create activity that eventually reaches the GL.
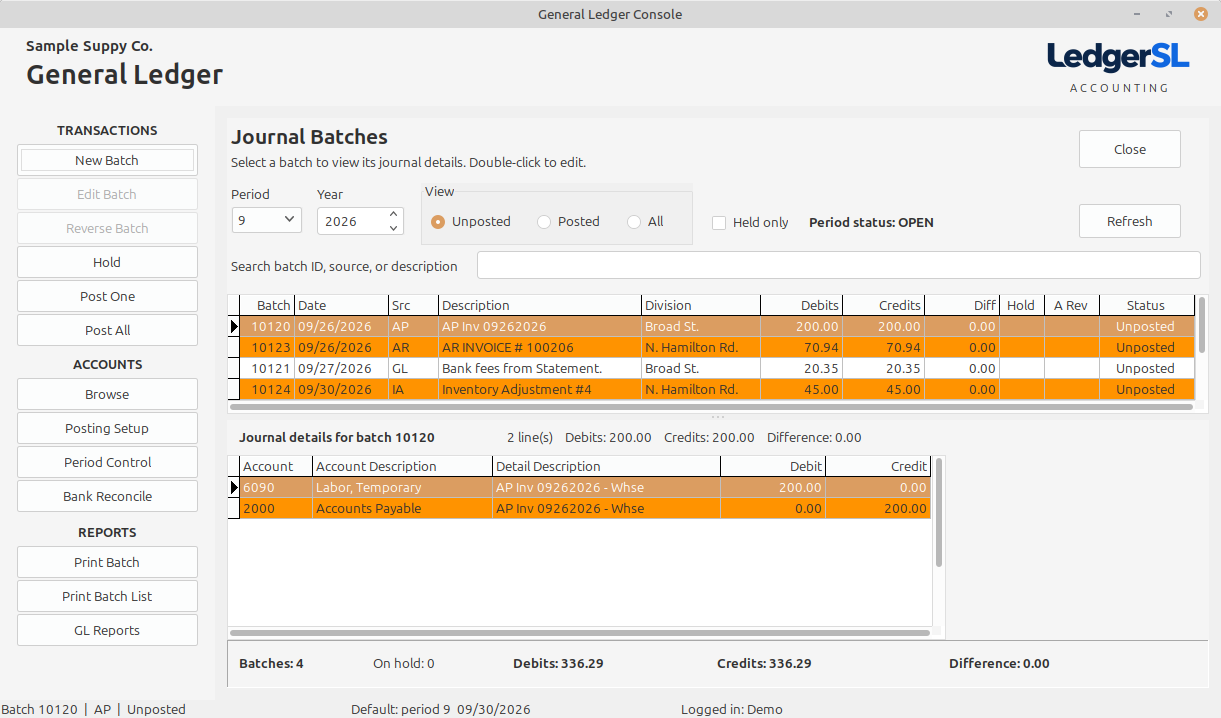
What the GL Console shows
The upper grid lists journal batches. Select a batch to see its account detail in the lower grid. Use the Year, Period, posted-status, hold, and search filters to narrow the list.
Manual versus source-generated batches
| Source | What it means | Can you edit it in GL? |
|---|---|---|
GL |
A journal entered directly in General Ledger. | Yes, while unposted. |
AR |
Created by Accounts Receivable. | No. Correct it in AR. |
AP |
Created by Accounts Payable. | No. Correct it in AP. |
| Inventory / Receiving | Created by Inventory or Purchasing activity. | No. Correct it in the source module. |
Common actions
| Action | What it does |
|---|---|
| New / Edit | Create or edit a manual GL batch. Posted batches cannot be edited. |
| Hold / Release | Temporarily prevents an unposted batch from posting, or makes it available again. |
| Reverse Batch | Creates a reversing journal for an eligible posted manual GL batch rather than changing history. |
| Print Batch | Prints the selected journal for review or filing. |
| Post One | Posts the selected eligible batch. |
| Post All | Posts eligible unposted batches in the current filtered view. Held batches are skipped. |
| Chart of Accounts | Browse and maintain GL accounts. |
| Posting Setup | Choose the control and default GL accounts used automatically by AR, AP, Inventory, and banking activity. |
| Period Control | Review whether accounting periods are open or closed and close/reopen periods when permitted. |
| GL Reports | Opens the consolidated General Ledger report selection screen. |
| Bank Reconciliation | Reconciles a bank statement to posted GL activity for the bank's cash account. |
Before you post
- Confirm the accounting date, fiscal year, and period.
- Confirm the batch is balanced: total debits must equal total credits.
- Read the description and source so you know what created the batch.
- If the batch is on hold, determine why before releasing it.
- For a source-generated batch, correct problems in the source module before posting.
Chart of Accounts
The Chart of Accounts is the list of accounts used to classify everything in the General Ledger. Typical account types are Assets, Liabilities, Equity, Revenue, and Expenses.
Each account has an account number and description plus classification information used by reports. A suspended account remains in history but should not be used for new posting.
GL Transactions
Use the GL transaction/detail view to review the journal lines belonging to a batch. The account, division, department, debit, credit, and description together form the audit trail for that posting.
Source descriptions should be specific enough to lead you back to the originating invoice, payment, receipt, or other document.
GL Account Selection
Select an active GL account for the transaction or setup field being edited. Read both the account number and description before accepting the selection.
General Ledger Reports
The GL Reports screen keeps the major General Ledger reports in one place. Choose the fiscal year and other available options, then preview or print the selected report.
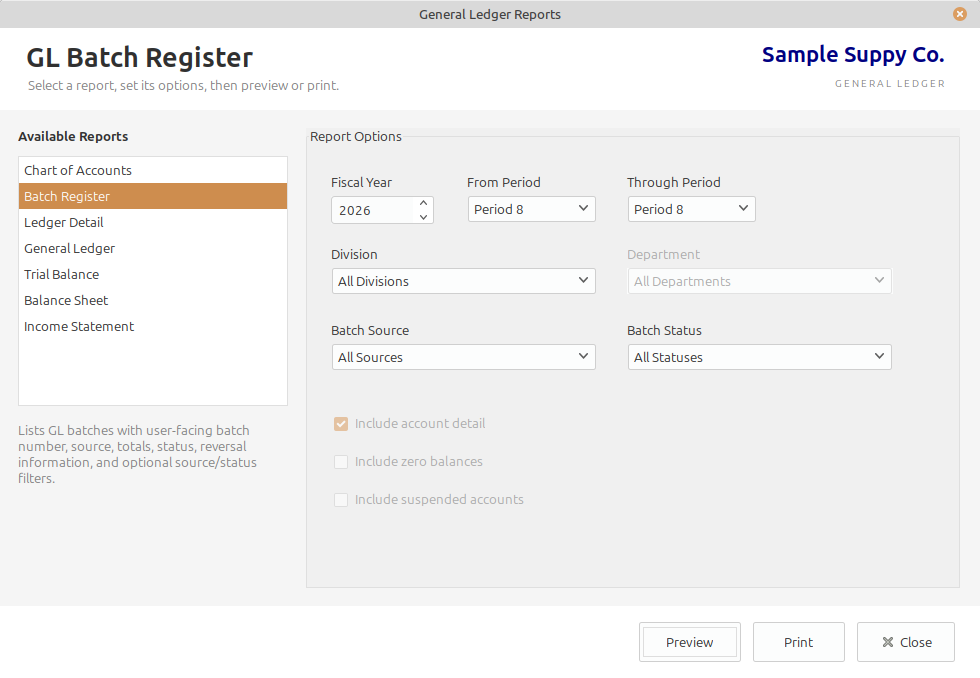
| Report | Use it for |
|---|---|
| Chart of Accounts | A clean listing of account numbers, descriptions, classifications, and status. |
| Ledger Detail | The individual posted journal lines for a period range. Use this when you need to see exactly what hit an account. |
| General Ledger | Beginning balance, period debits and credits, and ending balance by account. |
| Trial Balance | Debit and credit balances as of a selected period. The totals should balance. |
| Balance Sheet | Assets, Liabilities, and Equity as of a selected period, including current earnings where applicable. |
| Income Statement | Revenue, Cost of Sales, Gross Profit, operating expenses, other income/expense, and Net Income for the selected period and year-to-date. |
For a novice: which report do I want?
- “What happened in this account?” — use Ledger Detail.
- “What is the account balance?” — use General Ledger.
- “Do all debits and credits balance?” — use Trial Balance.
- “What do we own and owe?” — use Balance Sheet.
- “Did we make money?” — use Income Statement.
Bank Reconciliation
Bank Reconciliation proves that the bank statement and Ledger's posted cash activity describe the same bank account after allowing for transactions that have not yet cleared the bank.
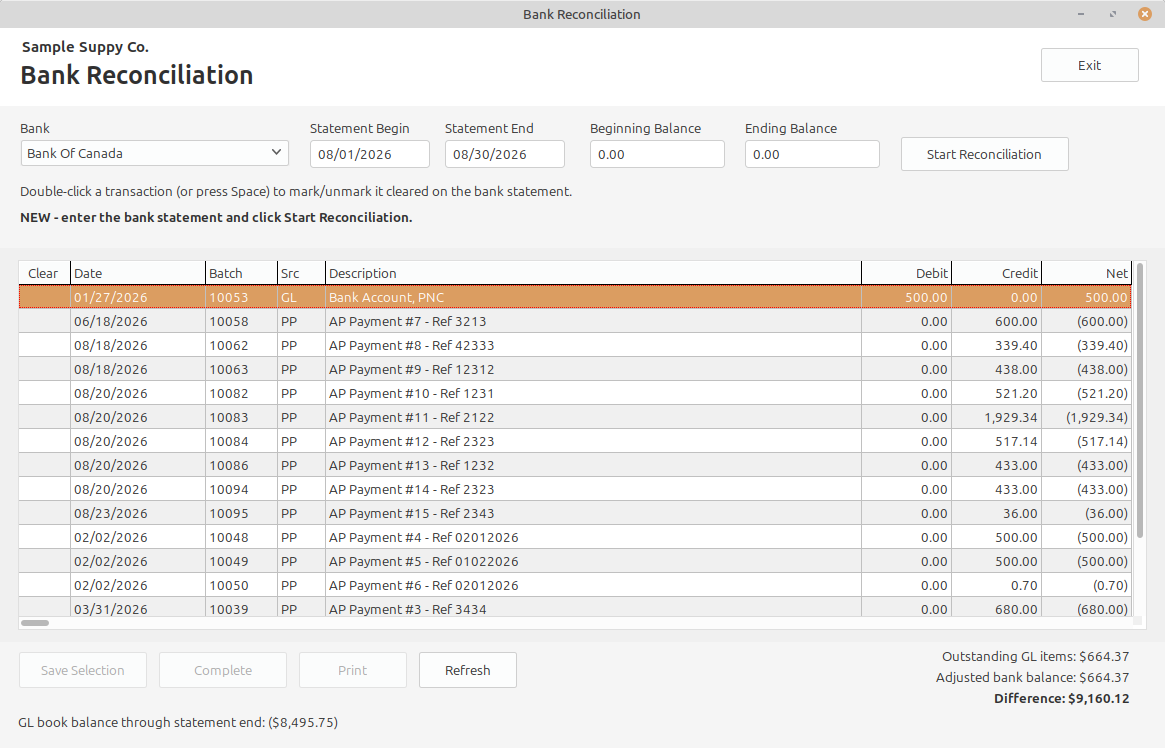
Before you start
- Select the correct bank account.
- Have the bank statement's beginning date, ending date, beginning balance, and ending balance.
- Make sure normal bank activity has been posted to GL through the statement date.
Normal workflow
- Select the bank account.
- Enter the statement dates and statement beginning/ending balances.
- Start the reconciliation.
- Compare the transaction grid with the statement.
- Double-click a transaction to mark it cleared or uncleared.
- Save if you need to stop and resume later.
- Continue until the reconciliation Difference is $0.00.
- Complete the reconciliation and print/save the reconciliation report.
What the totals mean
| Total | Meaning |
|---|---|
| Ending Bank Statement | The ending balance printed on the bank statement. |
| Outstanding GL Items | Posted Ledger bank activity that has not cleared the bank yet, such as outstanding checks or deposits in transit. Ledger applies the proper sign. |
| Adjusted Bank Balance | The statement balance adjusted for outstanding GL items. |
| GL Book Balance | Ledger's posted balance for the bank's GL account as of the reconciliation date. |
| Difference | Adjusted Bank Balance minus GL Book Balance. Completion requires zero. |
Checks and voids
Printed checks, handwritten checks, deposits, manual cash entries, and legitimate void/reversal entries all reconcile through the posted bank GL account. A spoiled check number remains part of check history even though it does not represent a cash withdrawal.
GL / Subledger Reconciliation
Subledger reconciliation is different from Bank Reconciliation. It compares a source module's accounting balance with its GL control account.
| Reconciliation | What is compared |
|---|---|
| AR to GL | Accounts Receivable subledger versus the AR Control account. |
| AP to GL | Accounts Payable subledger versus the AP Control account. |
| Inventory to GL | Inventory value/activity versus the configured Inventory control account, where supported. |
A nonzero difference is an exception that should be investigated rather than hidden with a manual control-account entry.
Accounts Receivable Console
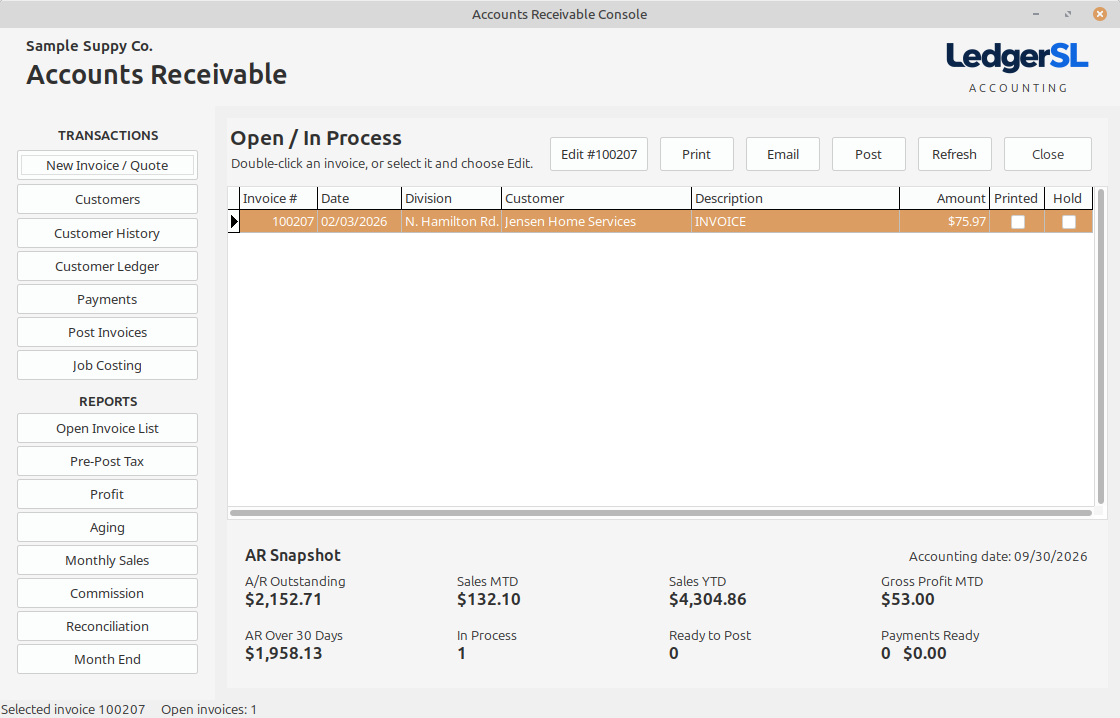
Accounts Receivable is where you manage money customers owe the company: invoices, credit memos, customer payments, aging, and customer history.
A normal AR day
- Create or maintain the customer if needed.
- Enter the customer invoice. For a correction to a posted sale, follow the adjustment workflow supported by your build.
- Review quantities, prices, taxes, dates, and customer information.
- Print the invoice when required by the posting workflow.
- Post eligible invoices.
- Enter and apply customer payments as they are received.
- Use the AR Snapshot and reports to review what is open and what needs attention.
Open invoice grid
The grid is your working list of AR documents. Use the year/period/status filters and search controls to find a document, then select it before using an action that applies to an existing invoice.
AR Snapshot
The snapshot below the grid gives an at-a-glance picture of AR. It may include:
| Item | What it tells you |
|---|---|
| A/R Outstanding | Total customer receivables currently outstanding. |
| Sales MTD / YTD | Posted sales for the accounting month and year. |
| Gross Profit MTD | Month-to-date sales less cost of sales. |
| AR Over 30 Days | Older receivables that deserve collection attention. |
| In Process | Documents still being worked on. |
| Ready to Post | Invoices that meet the posting rules. |
| Payments Ready | Customer payments waiting to be posted. |
Customer Maintenance
Add, review, and edit customer information, terms, addresses, and other defaults used during invoice entry.
AR Service Items
Service items represent billable work or charges that do not reduce inventory quantity. Maintain/select them separately from physical inventory items.
AR invoices: bill a customer, step by step
Use an AR invoice when your business sells goods or provides work to a customer. Start at Accounts Receivable → New Invoice / Quote. The entry window is called Order Entry.
Have these details ready
The customer, invoice date, items or work supplied, quantities, agreed selling prices, delivery address, and any customer purchase-order reference. Create the customer, inventory/service items, and job first if they do not yet exist.
1. Fill in the customer and document information
- Choose New Invoice / Quote. Check the company name at the top.
- Use Select Customer and choose the customer who will pay. Check the name and billing details before continuing.
- Set Document Type to the invoice option for an actual bill. Use the quote option for an estimate that is not ready to become a sale. Do not post an estimate as an invoice.
- Check Date, Division, Department, and the Accounting Period / Year. The date must belong to an open accounting period.
- Enter the customer's own reference in Customer PO, if provided. This is their purchase-order number, not your supplier PO number.
- Enter a useful Description / Note, such as “Oak Street — supply and install shelves.” Select the Job if this sale belongs to one. The job applies to this invoice; use separate invoices when different jobs must be tracked separately.
- Check Ship To and Sales Person where used. Select Hold Posting if the order still needs approval or more information.
2. Add each item or service
| Field | What to enter or check |
|---|---|
| Item # / Description | Select the existing product or service code. Check that the description is the item or work you intend to sell. |
| Ordered | The full quantity the customer requested. Use the item's unit of measure. |
| Fulfill From | For stock items, choose the physical stock location, for example WHSE. A service does not need a physical stock balance. |
| Ship | The quantity available to fulfill on this line. Ledger calculates stock availability; check the resulting quantity rather than assuming the full order can ship. |
| UOM / P/S | Check the unit and whether the item is a Product or Service. A service represents work, not warehouse stock. |
| Retail / Your Price | Retail is the reference selling price. Your Price is the price actually charged per unit on this line. |
| Extended | The line amount based on the quantity being billed and its price. In this entry workflow the line amount uses Ship × Your Price. |
- Select the item and enter Ordered.
- Choose Fulfill From for a stock item. Check Ship, the description, and the selling price.
- Choose Add Line. Check that the line appears in the invoice grid; values still sitting in the entry boxes are not a substitute for an added line.
- Repeat for the next item or service.
- To correct an added line, select it and choose Edit Line, make the change, and use the line action to save the revised line. Use Delete Line only for an unwanted line on an editable document.
Worked example: a shelf installation
For practice, create or use a product SHELF and a service INSTALL. Assume 10 shelves are available at WHSE, their recorded cost is 20.00 each, and the selling price is 35.00 each. Use a service with no recorded cost for this example. Choose the “Oak Street — shelf installation” job.
| Line | Ordered / Ship | Location | Your Price | Amount |
|---|---|---|---|---|
| SHELF — shelf unit | 10 / 10 | WHSE | 35.00 | 350.00 |
| INSTALL — installation visit | 1 / 1 | Not required for a service | 150.00 | 150.00 |
| Products 350.00 + Services 150.00, before any applicable tax | 500.00 | |||
3. Check, save, print, and post
- Compare every line with the customer order. Check quantities, prices, job, division, and warehouse.
- Review Products, Services, each tax amount, and Invoice Total. Taxes come from your configured customer/item/tax settings; use the setup appropriate to this sale.
- Choose Save and Close. Back in AR, find the invoice by customer, number, and amount. Reopen it to check or finish an unposted document.
- Choose Print and review the customer copy. Complete the printed-status confirmation when prompted. After an edit, check the current printed status and print the corrected copy if needed.
- When the invoice is final, remove Hold Posting and use Post Invoices / the posting action. Review the eligible documents before confirming.
- Check the customer's invoice history and, for a job invoice, the job detail. Review the generated batch in General Ledger and complete the GL posting step.
If there is not enough stock
If the customer orders 10 but only 6 can be supplied, keep Ordered = 10 and review the calculated Ship = 6. The remaining demand is handled through Product Needed. Keep the document on hold while resolving a shortage. After receiving the missing stock, reopen and check the order, quantities, total, and printed copy before posting. Do not add imaginary stock just to make the invoice go through.
Correcting an invoice
Correct an editable, unposted invoice in Order Entry and review its final copy again. The Document Type choices on the Order Entry forms covered here are Invoice and Quote; there is no credit-memo choice on that form. For a posted invoice, use the correction or adjustment workflow approved for your application build, with the original invoice reference. Have any returned-stock and customer-refund effects checked separately. Do not enter a negative ordinary invoice or edit its generated GL batch to force a correction.
Check your result: one invoice for the intended customer, the expected total, the correct job, and the correct stock location. Printing, posting the invoice, receiving payment, and posting the GL batch are separate steps.
AR invoice posting: finish the customer invoice
Posting finalizes eligible customer invoices. It records the sale, handles the related stock and job activity, and creates an accounting batch for General Ledger review.
- Finish and save the invoice in Order Entry.
- Print/review its final copy and confirm the printed status when prompted.
- Check that the invoice is not a quote, that the quantities are ready, and that Hold Posting is cleared.
- Open Post Invoices from Accounts Receivable. Check the invoice numbers, dates, customers, and totals in the posting list. If other invoices appear, include them in your review before confirming.
- Run the posting action and read the result. If an invoice is blocked, resolve the stated cause—such as an open period, missing posting account, hold, or stock issue—before retrying.
- Review the invoice in customer history. Open General Ledger and review the batch identified by that invoice. Post the GL batch after checking it.
If you are unsure whether posting succeeded: check the invoice status and the existing batch first. Do not create a second invoice to repeat the same sale.
Customer payments: record money received
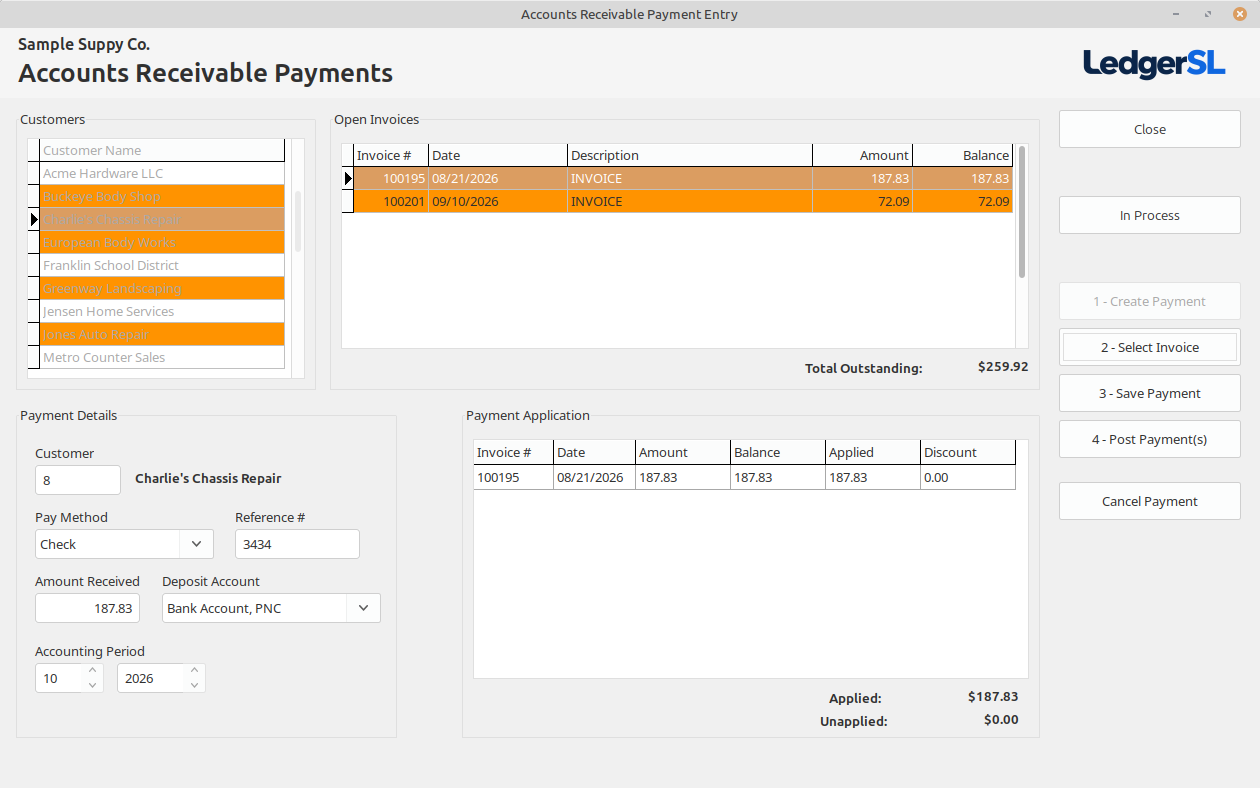
Use Accounts Receivable → Payments when a customer pays an existing invoice. This is different from receiving goods in Purchasing.
Step by step
- Check the application's Accounting Date before starting. In the entry versions covered here, the payment date comes from that date; it is not a separate Payment Date box on this form. Do not use an older invoice's date for a payment received today.
- Select the customer in the Customers list. Check their Open Invoices.
- Choose 1 - Create Payment first. This starts a clean payment and clears entry boxes from the previous payment.
- Select Pay Method. Enter Reference #, such as the customer's check number or bank reference. A check payment requires its check number.
- Enter Amount Received, the actual money received, and choose the correct Deposit Account.
- Select an invoice in the Open Invoices list and choose 2 - Select Invoice. Repeat for each invoice covered by this payment.
- In the application grid, check the amount applied to each invoice. For a part payment, enter only the amount being paid. Use a discount amount only for an actual approved discount; do not use it to hide an unexplained difference.
- Make the sum of the Applied amounts equal Amount Received. For the documented SL workflow, the payment cannot be saved with an unapplied remainder. Do not attach extra money to an unrelated invoice just to force a balance.
- Choose 3 - Save Payment. Record its reference and check the customer's invoice balance. Saving can already reduce the displayed balance, but the payment still needs posting.
- Choose 4 - Post Payment(s) after reviewing the saved payments ready to post. Check the posting result and the related GL batch.
Example: a 300.00 part payment
The customer's invoice balance is 500.00. Enter Amount Received 300.00, apply 300.00 to that invoice, and leave Discount at 0.00. The remaining invoice balance is 200.00. Complete payment posting and GL review; do not create a second sale for the payment.
If an invoice is already in an unposted payment: open In Process and review that payment rather than creating another one. If there is an overpayment or deposit without an invoice to apply it to, resolve the appropriate company workflow before saving.
Customer payment posting: complete the receipt of money
- Finish and successfully save the payment and its invoice applications.
- Review In Process / payments ready to post, checking the customer, date, bank account, reference, received amount, and invoice applications.
- Choose the payment-posting action. Review the eligible group before confirming.
- Read the result and check the payment/customer history. Do not judge posting status only by the invoice balance, which may have changed when the application was saved.
- Review and post the generated General Ledger batch. Later compare the bank deposit with the bank statement during reconciliation.
Customer History
Customer History answers two related questions for one customer: what documents are on the account? and what has this customer purchased? Select the customer and the appropriate date range/view, then use the account or purchase history as needed.
Account / document history
The account side is organized around customer invoices and account activity. It is the right place to look for document numbers, dates, invoice totals, paid amounts, remaining balances, and status when you need to understand the customer's AR history.
Purchase history
Purchase history answers the item-level question: what products or services did this customer buy, when did they buy them, in what quantity, and on which invoice? This is useful when a customer calls and says, “What was that item we bought last time?”
Use View Invoice to open the selected invoice when available. The form also provides Print Account History and Print Purchase History for the two views.
Customer Ledger
Customer Ledger is the account-level AR inquiry for following a customer's receivable balance through time. Use it when you need the accounting trail behind the customer's balance rather than the item-level purchase detail shown in Customer History.
What to look for
- Invoices and credits that increase or reduce the customer's receivable balance.
- Customer payments and other AR activity.
- Transaction dates, document references, descriptions, debits, and credits.
- The running customer AR balance through the selected activity.
For AR, a normal customer invoice increases the receivable with a debit; payments and customer credits reduce the receivable with credits. The ledger therefore provides a useful bridge between a customer's open balance and the AR subledger activity used by reconciliation.
AR Invoice History
Review historical invoice activity without reopening posted accounting documents for editing.
AR Payments and Adjustments
Review customer payment, application, discount, and adjustment activity. Posted history should be corrected through a proper accounting transaction rather than direct database edits.
Accounts Receivable Reports
AR reports are grouped conceptually in one place so you can answer the common customer-account questions without hunting through individual screens.
| Report / Inquiry | Use it for |
|---|---|
| AR Aging | Outstanding balances by age. Best report for collection follow-up. |
| Monthly Sales | Posted sales for a selected fiscal year/period. A selected invoice can be viewed using the normal invoice presentation. |
| Invoice Profit | Sales, cost of sales, and profit by invoice. |
| Customer History | Review a customer's invoice/payment history. |
| Customer Purchase History | Review what a customer has purchased. |
| Open Invoice List | Review invoices that are still open. |
| Sales Tax | Review taxable sales and sales-tax amounts. |
| AR-to-GL Reconciliation | Compare the AR subledger with the configured AR Control account. |
AR Aging
AR Aging shows open customer balances in age buckets as of the selected date. Use it to see which accounts are current and which are 30, 60, 90, or more days old.
Monthly Sales
Monthly Sales reviews posted invoices for the selected GL year and period. It can filter the list, show the total, preview the report, and open the selected invoice using the normal invoice design.
Invoice Profit Report
The Invoice Profit Report compares invoice sales with cost of sales. Sales tax is not revenue. Use the report to identify profitable and unprofitable customer work.
AR Sales Tax
Use Sales Tax reporting to review taxable sales and tax amounts collected for the selected period or reporting basis.
AR-to-GL Reconciliation
AR Reconciliation compares the Accounts Receivable subledger with the configured AR Control account through the selected date. Investigate any difference or exception before considering month end complete.
Salesperson commission review
The LedgerSL commission worksheet uses posted invoice and credit activity for the selected dates. Choose the salesperson, rate, and calculation basis, then inspect sales, cost, gross profit, and the resulting commission with its invoice detail.
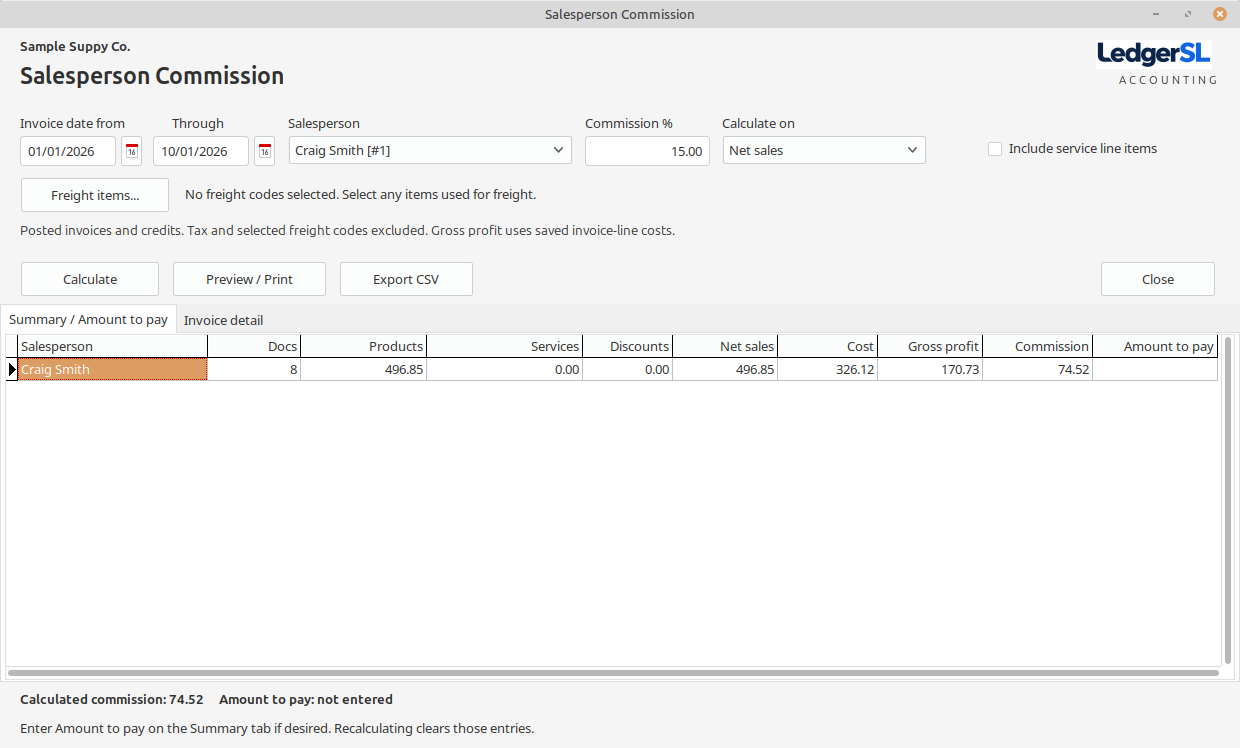
Check the available service-item and freight exclusions before accepting a total. Preview or print the result, or export CSV for review. A calculation worksheet and an amount entered to pay are not proof that a payment has been made; complete the company's appropriate payment process separately.
Accounts Payable Console
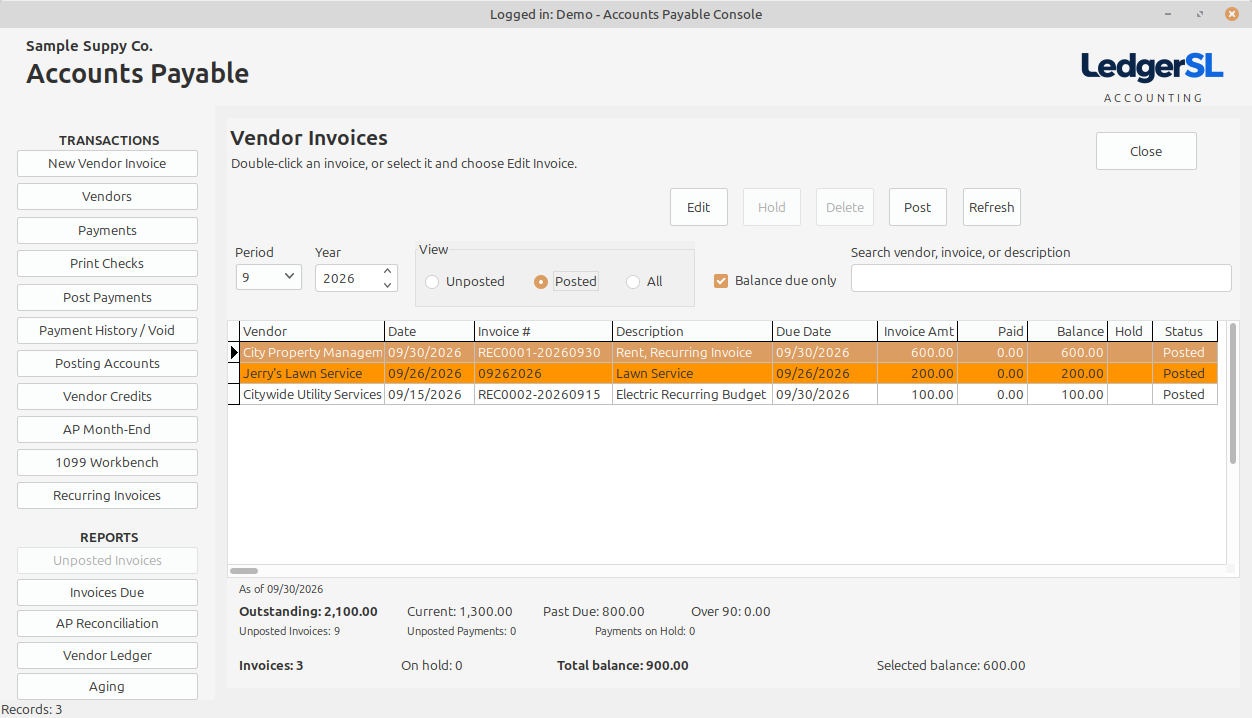
Accounts Payable is where you manage money the company owes vendors: vendor invoices, credit memos, payments, checks, vendor history, and AP reconciliation.
A normal AP day
- Enter vendor invoices and credits.
- Review and post eligible AP invoices.
- Create payments for approved open vendor invoices.
- Review the Payments Ready to Post list before posting.
- For check payments, print the checks (or explicitly mark a legitimate handwritten check) before final payment posting.
- Post payments.
- Use Aging, Vendor Ledger/History, reconciliation, and Month End to review AP.
Invoice grid
Use the fiscal year, period, posted-status, balance-due, and search filters to find vendor documents. The grid shows the vendor, invoice and due dates, amounts, balance, hold status, and posting status.
Important payment sequence
For checks, Check Printing sits between payment creation and payment posting. This prevents a check from being posted as if it left the bank before the check number and printing status are established.
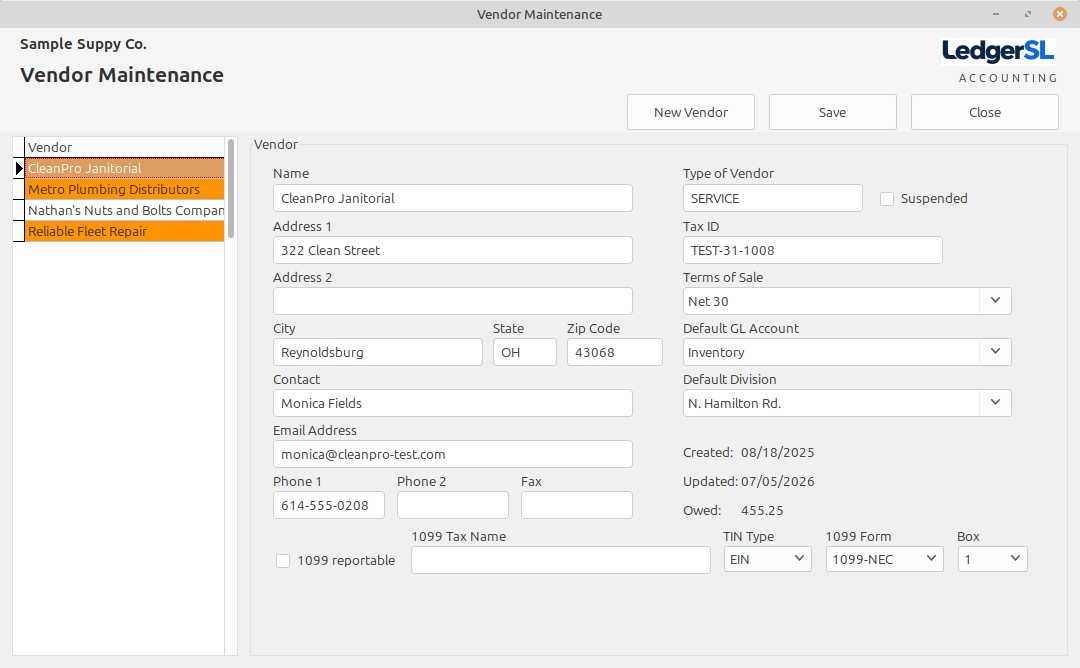
Vendor Maintenance
Maintain vendor names, addresses, terms, payment information, and other defaults used by AP and Purchasing.
AP invoices: enter a supplier bill, step by step
Use Accounts Payable → New Vendor Invoice to record a bill you received. This records what you owe; it does not pay the supplier and does not receive inventory.
Have these details ready
The supplier's bill, supplier name, invoice number, date, due date, total, and what was purchased. For inventory bought on a PO, also have your PO number and the posted goods receipt(s). Check existing vendor invoices first to avoid entering a bill twice.
1. Enter the bill information
- Choose New Vendor Invoice and confirm the company name.
- Choose Vendor..., then the supplier on the bill. Check the vendor name before entering the number.
- Choose the invoice option under Document Type. Choose the credit-memo option only for a supplier credit.
- Copy the supplier's reference into Invoice #, including meaningful letters or suffixes. This is the supplier's number. Ledger checks for an existing reference for the same vendor.
- Enter the bill's Date. Review Discount Date and Due Date against the supplier's terms. A discount date is the deadline for an offered early-payment discount; it does not mean a discount has already been taken.
- Enter the exact bill total in Amount. Enter a useful Description / Note, such as “Oak Street — subcontract installation, supplier bill S-104.”
- Check Period and Year against the invoice date. If the period is closed, have the date/period issue resolved before continuing.
- If this is a PO bill, enter/select the matching Purchase Order. View Vendor POs helps find a supplier's orders. Check the PO belongs to this vendor. A suggested amount from a PO must still be changed to the amount actually billed.
- Select Hold if the bill needs approval, a correction, or a missing delivery check.
2. Explain the amount with distribution lines
A distribution line says what part of the bill is for. The sum of these lines must exactly equal the bill's Amount.
- Choose the appropriate GL Account from your company's account list. For example, a routine supplies bill uses the supplies category approved by your company.
- Choose the Division responsible for that amount.
- Enter a line Description and its Amount.
- LedgerSL: where Job (optional) is displayed, select the job for this line if applicable. LedgerPG: the version covered by this guide does not display this AP job selector; put the job reference in the description and follow the manual job-cost tracking instructions.
- Choose Add Line and verify the row in the distribution grid.
- Repeat to split a bill between categories, divisions, or—in editions with the field—jobs. Select a row and choose Edit Line to correct it.
- Compare Distribution Total with the header Amount. If they differ, find the missing or incorrect amount; do not change the supplier's total merely to make the form save.
Worked example: split a 150.00 bill
| Header / line | Example entry |
|---|---|
| Vendor / Invoice # | Sample Supply / SS-1042 |
| Amount | 150.00 |
| Distribution 1 | Office Supplies; MAIN; “Printer paper”; 100.00 |
| Distribution 2 | Cleaning Supplies; MAIN; “Workshop cleaning supplies”; 50.00 |
| Distribution Total | 150.00, matching the bill |
Use your actual account names. If your business uses one supplies account, one 150.00 distribution is sufficient. The example does not require you to create extra accounts.
3. Special case: inventory received against a PO
Receiving the stock and entering the supplier bill are two separate records of two different events. First post the goods receipt in Purchasing. Then link the AP invoice to the same PO.
- Compare the bill with the PO and posted receipts. For example, 6 shelves received at 20.00 each have a receipt value of 120.00.
- Enter the supplier's actual bill number, date, and amount, and the correct PO.
- For the merchandise portion, use the Inventory account configured in Posting Account Setup. In this PO-linked workflow Ledger redirects that distribution to Received Not Invoiced (RNI) when posting, so inventory is not added a second time. Your company may have other approved distributions for separate charges.
- For a bill covering only those 6 shelves, use 120.00 for that merchandise amount. Do not use the full 200.00 order amount for a 120.00 partial bill.
- When posting, read any Purchase Price Variance question carefully. Choose Yes only when this bill covers all remaining received merchandise and the difference really is a price difference. For a partial bill, choose No; leave the unbilled receipt value to be cleared by later bills.
- If the documents do not explain a difference, leave the invoice on hold and resolve it before posting.
4. Save and finish
- Check vendor, reference, dates, amount, distributions, division, PO, and Hold.
- Choose Save and Close. Find the invoice in AP and check its total. Keep the supplier's bill with your records.
- When approved, clear Hold and use Post. Review the posting selection/count and any variance question before confirming.
- Check the vendor's invoice and balance, then review and post its generated GL batch.
- Pay it later through AP Payment Entry. Do not enter it again when the payment is made.
Supplier credits
Choose the credit-memo document type and enter the supplier's credit reference and positive amount. Distribute it to the appropriate categories and reference the original bill in the note. After posting, use Vendor Credits to apply it where appropriate. A credit for returned goods does not replace the required physical stock correction.
Job-cost check: selecting a job on an AP line does not, in the versions covered here, automatically add an expense to the Job Costing detail. Follow the job instructions to record a missing job-only cost once, with the AP reference, and avoid duplicating costs already shown.
AP invoice posting: finish recording the supplier bill
- Find the saved invoice in Accounts Payable. Check the vendor, invoice number, date, amount, and distributions.
- Make sure the bill is approved and Hold is cleared only for invoices that are ready.
- Choose Post. Review the eligible invoices/count shown by the posting workflow. Do not assume that only the highlighted row will be processed.
- For a PO-linked inventory invoice, check any price-variance prompt against the bill and receipts. A partial bill is not automatically a price variance.
- Read the completion message. Review the vendor ledger or invoice list to confirm the bill was recorded once.
- Review and post the generated General Ledger batch. Posting a bill records a payable; use the payment workflow when paying it.
If posting is blocked, resolve the named account, period, distribution, or document issue. If the process was interrupted, check the saved status before trying to enter the bill again.
AP Payment Entry
Payment Entry creates a payment for one or more open vendor invoices.
- Select the vendor and the invoices being paid.
- Review invoice date, due date, amount, balance, discounts, and amount to pay.
- Select Check as the payment method when a paper or handwritten check will be used.
- Confirm the bank/cash account assigned to the payment.
- Leave Hold unchecked when the payment is ready for check printing.
- Save the payment.
A check payment may be saved before it has a check number. The check number is assigned during the Check Printing workflow from that bank account's Next Check Number. Saving an invoice alone does not place it in the print queue; a saved AP payment must exist.
Payments Ready to Post
Before posting AP payments, Ledger can show a review list so “2 payments ready to post” does not leave you wondering which two.
The review shows the payment number, date, vendor, method, reference, amount, payment count, and grand total.
Why this screen matters
- Confirm the vendor and payment amount before posting.
- Catch an unintended payment while it can still be corrected normally.
- Verify the total cash requirement for the posting run.
- For check payments, make sure required check printing/handwritten status is complete.
AP Check Printing
Check Printing assigns and records check numbers, previews/prints checks, and protects the check-number sequence for each bank account.
The basic rule
How to reach the print queue
- From the Accounts Payable Console, open Payments.
- On Payment Entry, create the payment, select the vendor and invoices, choose Check, select the bank/cash account, leave Hold unchecked, and save.
- Open the print queue with Print Checks on the AP Console. You can also use Payments > Saved Payments > Print Checks.
- Select the saved payment. The grid contains payments—not unpaid invoices—and shows only Check payments that are unposted, not held, and not voided.
Print, handwritten, and spoiled checks
- Choose Preview / Print, or double-click the payment. Ledger assigns the bank's next available check number when needed and opens the check preview.
- Print from the preview. Answer Yes to “Did the check print correctly?” only after inspecting the physical check.
- For a check genuinely written outside the printer workflow, select the payment and choose Mark Handwritten. Ledger assigns the next number when needed and records it as handwritten.
- If the physical check is damaged, choose Spoiled / New #. The spoiled number remains in history and Ledger assigns a replacement.
- After the check is printed or marked handwritten, post the AP payment.
Why the bank account matters
Each payment belongs to one bank account, and each bank account has its own Next Check Number. Two different banks may legitimately be using different check-number sequences—or even happen to be at the same visible number—without conflict because the bank is part of the identity of the check.
Each payment should appear only once in the printing queue, under the bank account stored on that payment.
Spoiled checks
If the printer damages check 1047, that number must not quietly disappear and must not be reused. Ledger retains spoiled/voided check-number history and moves on to a new number.
Handwritten checks
If a check was genuinely written by hand outside the printer workflow, use the handwritten-check path so Ledger records that fact and the check number before payment posting.
Troubleshooting the check list
- The grid is empty or a payment is missing: confirm a payment—not just an invoice—was saved with Method = Check, Posted = No, Hold = No, and Voided = No. Printed checks remain visible until posted.
- The bank is wrong: review the bank account stored on the payment before printing.
- The next number is wrong: review the bank's Next Check Number and prior check history before changing it.
- A payment appears twice: do not print both rows. The queue should contain one row per payment; contact support with the payment and bank references before continuing.
AP Payment Posting
Payment posting reduces the AP liability and creates the cash/bank credit, leaving the resulting GL batch unposted for final GL review.
For check payments, the check must already satisfy the printing/handwritten requirement. This keeps the accounting event tied to a real, identified check rather than an unnumbered promise to print one later.
AP Bank Accounts
Bank Accounts define the cash accounts used by payments and check printing. For check printing, each bank maintains its own Next Check Number.
Vendor Credit Application
Use Vendor Credit Application to apply a posted vendor credit memo to a posted open vendor invoice. The form keeps a separate application history so the use of the credit remains auditable.
Normal workflow
- Select the vendor.
- Choose the application date.
- Select the available posted credit memo.
- Select the posted open invoice that should receive the credit.
- Enter the amount to apply and an optional memo.
- Choose Apply Selected Credit.
The application changes how the already-posted vendor credit is assigned against open AP. It does not create another AP or GL posting because the invoice and credit memo already established the accounting when they were originally posted.
Void AP Payment
Voiding a posted payment preserves the original history and creates the appropriate reversing AP/GL activity rather than erasing the payment. A voided check number remains in history and is not reused.
AP Payment History
Payment History is the operational audit view for AP payments. It shows both posted and unposted payments and their invoice applications, discounts, adjustments, and status. Use it before invoking a void and whenever you need to answer exactly how a payment was applied.
For the controlled reversal procedure, see Payment History / Void.
Vendor History
Review the selected vendor's historical invoices, credits, payments, and related AP activity.
Vendor Ledger
Vendor Ledger is a read-only AP subledger inquiry for one vendor over a selected date range. Use it when you need a beginning balance and a chronological explanation of how that vendor's AP balance changed.
What it shows
- opening balance before the From date;
- invoices, credit memos, payments, and reversals;
- debit and credit amounts;
- running AP balance;
- period debit and credit totals and balance through the Through date;
- GL batch and source references for tracing transactions.
Use Print Ledger when you need a paper/PDF copy of the same vendor and date range.
Accounts Payable Reports
Use AP reports to answer the common questions about what is owed, what has been paid, and whether AP agrees with the General Ledger.
| Report / Inquiry | Use it for |
|---|---|
| Invoices Due | Vendor invoices coming due through a selected date. |
| AP Aging | Outstanding vendor balances grouped by age/due status. |
| Payment History | Payments already made, including vendor, date, reference/check information, and amount. |
| Vendor History | A vendor-oriented history of invoices, credits, payments, and related activity. |
| Vendor Ledger | Beginning balance, transactions, debits, credits, running AP balance, and closing balance for one vendor/date range. |
| AP-to-GL Reconciliation | Compares the AP subledger with the configured AP Control account and lists exceptions. |
| Payments Ready to Post | A pre-posting review of the payments that are about to be posted. |
Vendor List
Use the Vendor List for a printable or reviewable list of vendor master records.
AP Aging
AP Aging shows outstanding vendor balances by age/due status. Use it to plan cash requirements and identify old unpaid items.
AP Register
Use the AP Register to review AP transaction activity for the selected reporting range.
Vendor Chart
Use vendor analysis/chart information when available to review vendor activity visually.
Recurring bills and vendor reporting
LedgerSL includes recurring AP and vendor 1099 support. Recurring bills help with repeated supplier charges, but each generated bill still needs review of its date, period, amount, and distribution before normal posting.
Keep the vendor's identity and relevant reporting information current. Review the 1099 Workbench and its exported information against the vendor's recorded payments before using it in a filing workflow. An export is not confirmation that a return has been submitted. Use the instructions applicable to your installed application and filing process.
Inventory / Purchasing Console
Use Inventory/Purchasing for products, purchase orders, receiving, transfers, adjustments, product-needed review, and inventory reporting.
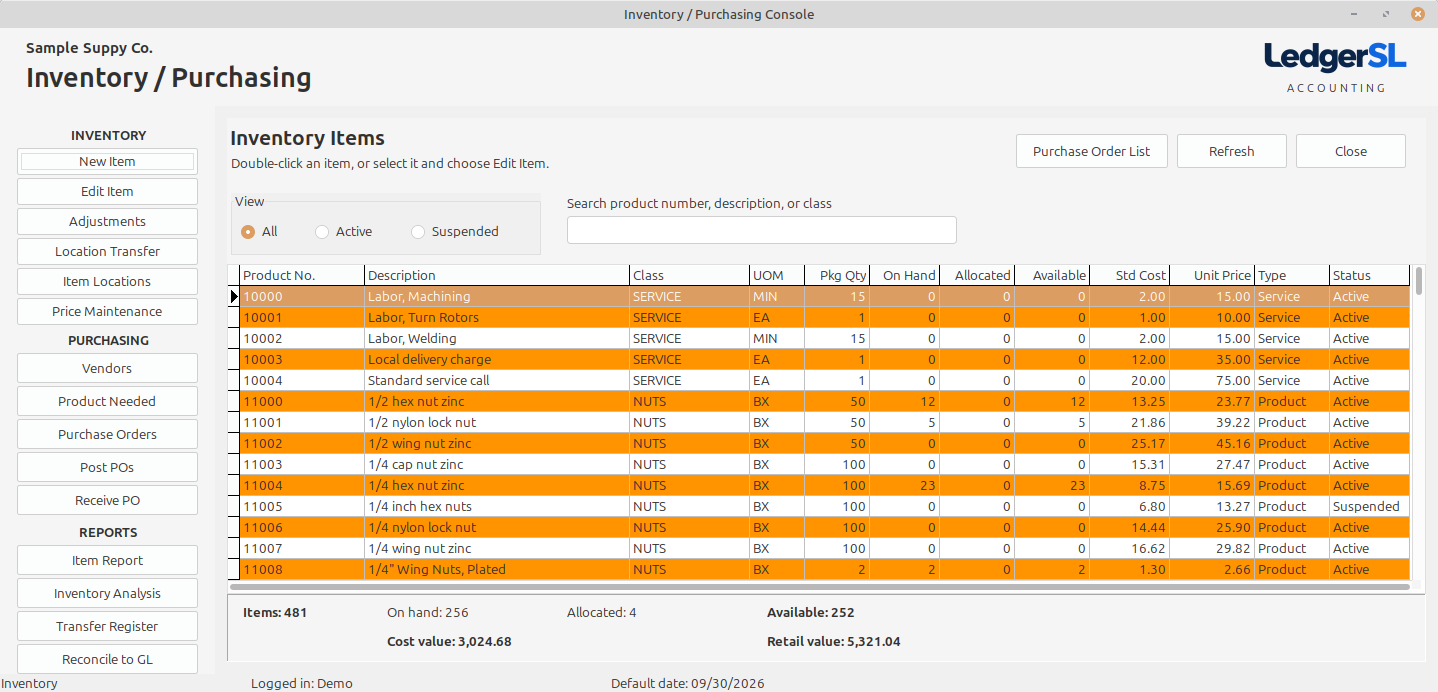
Basic accounting flow
| Event | Accounting |
|---|---|
| Create PO | No GL entry. |
| Receive inventory | increase Inventory / increase Received Not Invoiced. |
| Enter PO-linked AP invoice | Dr Received Not Invoiced / Cr Accounts Payable. |
| Pay vendor | Dr Accounts Payable / Cr Bank. |
Inventory Product Maintenance: create an item
Start at Inventory / Purchasing → New Item. A product record describes an item; its stock quantities come from stock movements.
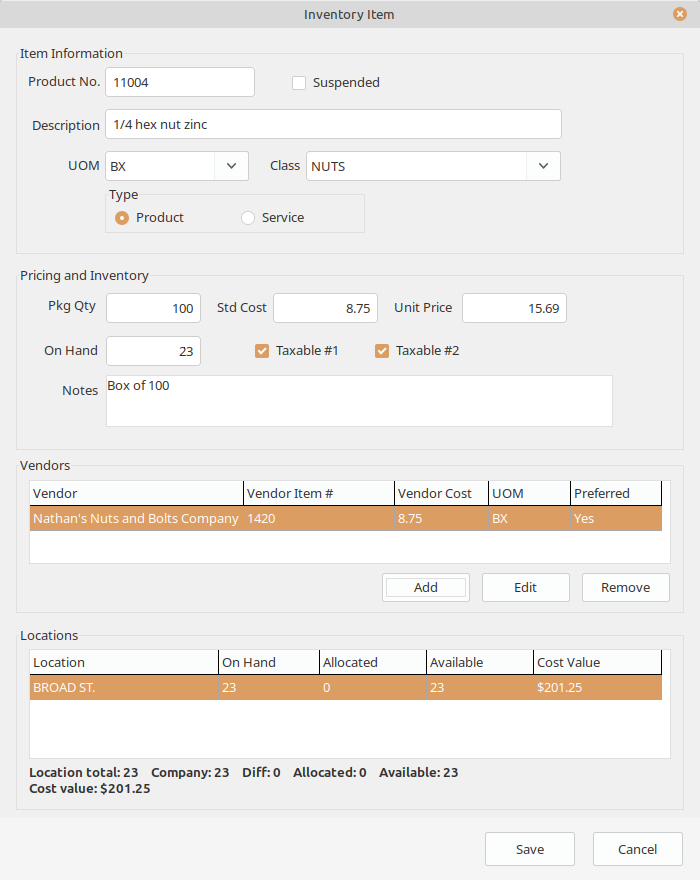
- Enter a unique Product No., such as SHELF, and a clear Description.
- Select the UOM and Class. If one unit means a box, use that meaning consistently when purchasing and selling.
- Select Type: Product for physical stock or Service for work you sell. Service items do not carry physical stock by location.
- Check Pkg Qty, Std Cost, and Unit Price. Cost is what the item costs your business; Unit Price is the normal selling price.
- Check Taxable #1 and Taxable #2 against your company's tax setup.
- Enter useful Notes and add supplier information in Vendors if needed.
- Choose Save. Use receiving or an approved opening adjustment to establish stock at WHSE; do not use the item's on-hand display as a replacement for stock entry.
- Reopen the item to check its details and Locations balances after the stock transaction is posted.
Suspended is for an item that should no longer be used in normal new activity. Check outstanding orders and remaining stock before suspending an item.
Inventory locations: one WHSE or several places
An inventory location describes where physical stock is kept. A small business can use a single code such as WHSE (warehouse). You do not need several warehouses to use inventory.
Set up a business with one stock location
- Choose WHSE as your standard location code. “Whse” is a readable abbreviation, but these workflows normalize the stored code to uppercase. Use WHSE consistently rather than alternating between WHSE, WAREHOUSE, and MAIN.
- Create each item through Inventory / Purchasing → New Item. Enter its product number, description, unit, product type, and prices, then save it. See Inventory Product Maintenance.
- For newly purchased goods, enter WHSE on the PO line, confirm it on Receive PO, and post the receipt. This establishes or increases that item's WHSE balance.
- For stock already owned when you start using Ledger, use a documented opening Adjustment with WHSE and the counted quantity. Have the opening value and offset account agreed as part of company setup. Do not receive that same opening stock again on a fictitious PO.
- Open Item Locations, filter for WHSE, and choose Refresh. Confirm each item's quantity. An item with no stock movement may not yet have a location row.
- On customer invoices, choose WHSE in Fulfill From for stocked products.
Add a second location only when you need it
Suppose some stock will be carried on a service van. Use VAN1 as a second code. Receive new supplier goods directly into VAN1 if that is where they arrive, or use Location Transfer to move stock already in WHSE. Do not create a second inventory product code simply because the same product is stored in another place.
| Event | WHSE | VAN1 | Company on hand |
|---|---|---|---|
| 10 shelves received into WHSE | 10 | 0 | 10 |
| Transfer 3 available shelves to VAN1 | 7 | 3 | 10 |
| Sell and post 2 from VAN1, with no other movements | 7 | 1 | 8 |
A transfer changes where stock is held; it does not buy more stock. A division can own stock at more than one location, and a job can use stock from more than one place.
Check balances regularly
- Use Item Locations for quantities and values by stock location.
- Open an item with Edit Item to see its Locations grid, including On Hand, Allocated, Available, and the comparison with the company total.
- Count the physical goods. If the count differs, check receipts, sales, transfers, and the dates before making an adjustment.
- If goods were assigned to the wrong location, use a transfer when appropriate. Do not add stock to the new location and leave the old stock unchanged.
- If you see UNASSIGNED or a location-total difference, review the earlier transactions and resolve the allocation. Do not add that quantity again as a new purchase.
Purchase orders: order goods from a supplier
A purchase order (PO) records what you ask a supplier to provide. It does not record a delivery, a supplier bill, or a payment.
Before you start
Have the vendor set up, the item codes, quantities, agreed unit costs, delivery location, and any delivery instructions. Use the same unit of measure you will use when receiving the goods.
1. Enter the order
- Open Inventory / Purchasing → Purchase Orders. Choose New when starting another order.
- Check the proposed PO # and Date. Use your normal numbering sequence and do not reuse an existing PO number.
- Select Vendor, then check the displayed Vendor Address.
- Choose the responsible Division and Department.
- Enter an internal PO Memo and any Note to Vendor. For a job purchase, include the job ID/name here; this PO form does not have a dedicated job selector.
- Enter/select Item Number. Double-clicking that field opens the item selection workflow in these versions. Check Description and the supplier's Vendor Item # if used.
- Enter Location, for example WHSE, to identify where the goods are expected to be kept. This is separate from Division.
- Enter Ordered and Unit Cost. Unit Cost is your purchase cost per unit, not the selling price. Check Extended Cost.
- Choose Add Line. Repeat for all items. Double-click an existing line to load it for correction and use the line update action to keep the change.
- Check Purchase Total, then choose Save.
Worked example: 10 shelves for WHSE
| Field | Example |
|---|---|
| Vendor / PO Memo | Sample Supply / “Oak Street shelves — job reference” |
| Item Number / Location | SHELF / WHSE |
| Ordered / Unit Cost | 10 / 20.00 |
| Extended Cost / Purchase Total | 200.00 / 200.00 for this one-line order |
2. Review, print, and post the PO
- Choose Print PO. Check supplier, item descriptions, quantities, prices, and delivery instructions.
- When the print/preview workflow asks whether the PO should be marked printed, confirm only after checking the document. Send the order to the supplier by your normal method. LedgerSL also provides Email PO where configured; the PG form covered here does not have that button.
- Return to Inventory / Purchasing and choose Post POs. This posts the group of eligible printed, open, unposted POs. Check the count and make sure every eligible PO is ready.
- Confirm posting. Posted POs become read-only. Their Posted checkbox shows the result; it is not a substitute for running Post POs.
- When goods arrive, use Receive PO. Do not type received quantities into the original PO to bypass receiving.
Expected result: a posted PO for 200.00, ready to receive. On-hand stock has not increased and no GL batch has been created merely by posting the PO.
If you cannot find the PO for receiving
Check the company, PO number, vendor, printed status, posted status, and whether the PO is closed. The receiving list requires a posted, open PO. A fully received PO closes automatically. Reopening the entry screen is not the same as reopening a closed order.
Purchase order receipts: record what actually arrived
Use Inventory / Purchasing → Receive PO when goods arrive from a supplier. Enter the quantity actually accepted into stock, which can be less than the ordered quantity. This is a goods receipt, not a customer payment and not the supplier's bill.
Before you start
Have a posted, open PO, the delivery/packing slip, the receipt date, and a count of usable goods received. Confirm which physical location will hold them. Check whether someone else has already recorded the delivery.
1. Create the receipt
- Choose Receive PO, then New Receipt.
- Enter/check Receipt Date. Use the date the goods were received; the form accepts the displayed month/day/year date format. The date must be valid for your accounting setup.
- Select the Purchase Order. Check the PO's items against the delivery slip.
- Enter a Memo containing the supplier delivery-note reference and useful details, for example “Delivery DN-88: 6 of 10 shelves received.”
- Review the receipt grid using the field guide below.
| Column | Meaning / action |
|---|---|
| Ordered | The full PO quantity. |
| Received | Quantity already recorded by earlier posted receipts. |
| Remaining | Quantity still to be received against the order. |
| Receive Now | Enter only this delivery's accepted quantity. Use 0 for a line that did not arrive. Quantities must be whole numbers and cannot exceed Remaining. |
| Location | Confirm or enter the actual stock location, such as WHSE. Stock products need a location. Use a short consistent code of at most 10 characters. |
| Unit Cost / Line Total | Cost brought from the PO and the value of this receipt line. The receipt's editable cells are Receive Now and Location; handle supplier bill price differences through the bill/variance workflow. |
2. Save, check, and post
- Enter Receive Now for each received line and check its Location. Count damaged or missing goods separately and resolve them with the supplier; do not count goods you did not accept into usable stock.
- Compare This receipt line/unit counts and Receipt Total with your delivery count and expected cost.
- Choose Save Receipt. Keep the receipt reference. Saving preserves an unposted receipt for review; it does not yet add the goods to on-hand stock.
- If you stop before posting, use Open Receipt to reopen the saved unposted receipt. Do not choose New Receipt for the same delivery again.
- When correct, choose Post Receipt and read the confirmation. This updates stock and the PO received quantities.
- Record the GL batch reference shown for a stock receipt. In General Ledger, review the receipt batch and post it after checking it.
- Use Item Locations and the PO list to confirm the quantity and remaining order balance.
Worked example: one order, two deliveries
The PO is for 10 shelves at 20.00 each. Assume the example starts with none of this item in WHSE and no other movements occur.
| Delivery | Received before this receipt | Receive Now | Receipt value | Result after posting |
|---|---|---|---|---|
| First delivery | 0 | 6 | 120.00 | WHSE has 6; PO has 4 remaining and stays open. |
| Second delivery | 6 | 4 | 80.00 | WHSE has 10; PO is fully received and closes automatically. |
On the second receipt, enter 4, not the cumulative total of 10. Recording 10 again would overstate the delivery and is blocked when it exceeds the remaining quantity.
What happens in the accounts?
For normal stock receipts, Ledger records the increased inventory value and the temporary RNI amount in an unposted GL batch. The later PO-linked supplier invoice clears that temporary amount and records what you owe the supplier. Receiving goods alone does not create that supplier invoice or pay it.
If the PO was created from Product Needed, posting the receipt can also update linked customer-order quantities. Reopen the customer order and check the quantity, location, price, hold, and final total before printing/posting it.
If a receipt is wrong
Correct a saved unposted receipt before posting. For an already posted receipt, keep its reference and use the appropriate stock/accounting correction with the person responsible for your books. Do not post the same delivery a second time or alter the original PO's received total to hide the error.
Product Needed
Product Needed is the purchasing queue for customer-order shortages. When an unposted customer invoice contains a product quantity that is not available at the required location, Ledger records the shortage here so purchasing can see what is needed, for whom, where, and from which vendor.
What the grid shows
The inquiry includes Status, Required date, Vendor, Product Number, Description, UOM, Location, Requested quantity, Available quantity when the order was entered, Needed quantity, Received quantity, PO number, customer Invoice, and Customer.
Status workflow
| Status | Meaning |
|---|---|
| OPEN | The shortage exists but is not yet committed to a PO. |
| ORDERED | The requirement is linked to a saved Purchase Order line. |
| PARTIAL | Some of the linked PO quantity has been received, but not enough to satisfy the customer requirement. |
| RECEIVED | Enough linked PO quantity has been received to satisfy the requirement. |
| FULFILLED | The customer invoice has completed its posting workflow and the requirement is finished. |
Create a Purchase Order
- Review OPEN requirements and assign a vendor where one is missing.
- Ctrl-click to select one or more OPEN rows for the same vendor.
- Choose Create Purchase Order.
- Review the draft PO, including vendor item number, cost, quantity, description, and location.
- Save, print or email, and post the PO through the normal purchasing workflow.
What happens when stock arrives
Receipt Entry updates the linked requirement to PARTIAL or RECEIVED as cumulative PO receipts arrive. The received stock is also tied back to the waiting customer invoice: Ledger updates its Ship quantity up to the ordered quantity and synchronizes the actual receiving location with both the invoice line and Product Needed row.
Because the customer order already owns that commitment through inventory allocation, newly received stock for the linked requirement is not treated as free Available quantity for another customer.
Item Locations: check stock by place
- Open Inventory / Purchasing → Item Locations.
- Enter an item number or description in Search, or choose a Location and Class to narrow the list.
- Choose whether to show Active only and Quantity / exception only, then Refresh. Clear restrictive filters if an expected item is missing.
- Check Item, Description, Location, Qty, Std Cost, Cost Value, Retail, Retail Value, and Status. Cost Value and Retail Value answer different questions: what the stock is valued at versus its indicated selling value.
- Choose Print when you need a report for checking stock.
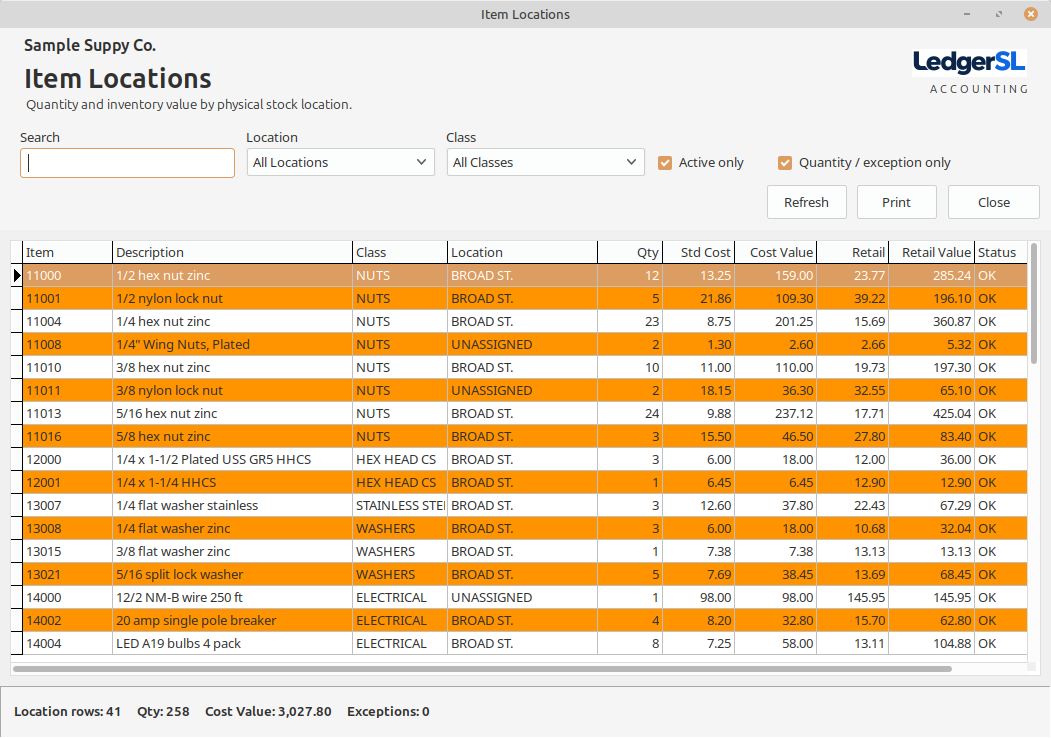
This is a review screen. To put stock in a new place, follow Inventory location setup and use a receipt, adjustment, or transfer. An empty filtered list does not by itself prove that the company owns no stock.
Inventory Location Transfer: move existing stock
- Open Inventory / Purchasing → Location Transfer.
- Select From Location, such as WHSE. Enter/select To Location, such as VAN1. The two must differ.
- Check Transfer Date. Enter a useful Reference and Memo; include the relevant invoice reference where that field is used.
- Enter the quantity to transfer for each item in the grid. Only stock available at the source location can be moved: Available = On Hand − Allocated.
- Review the item, source, destination, and quantity. For example, transferring 3 of 10 unallocated shelves leaves 7 in WHSE and 3 in VAN1.
- Choose Post Transfer and read the confirmation.
- Check Item Locations and the Transfer Register. The company-wide quantity should be unchanged by the transfer.
If the goods are already reserved for an order, resolve that order's allocation before moving them. A location transfer does not create a sale, supplier bill, or job expense.
Inventory Adjustment: record a supported stock correction
Use an adjustment for an agreed opening balance or a stock difference that is not a normal purchase receipt, sale, or location transfer. Count and investigate a difference before changing the records.
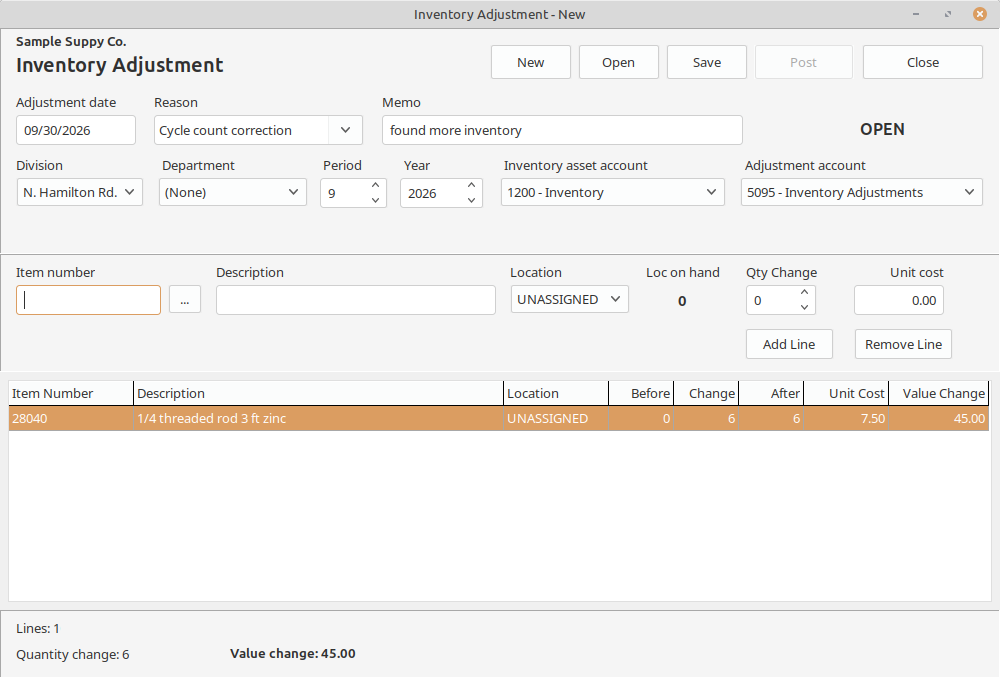
- Open Inventory / Purchasing → Adjustments, then New.
- Check Adjustment date, Reason, Division, Department, Period, and Year.
- Enter a Memo explaining the count or source, such as “Opening stock count, approved worksheet 01.”
- Check Inventory asset account and Adjustment account against the accounts approved for this correction. An opening balance can need different accounting treatment from ordinary shrinkage.
- Select Item number and Location, for example WHSE. Review Loc on hand.
- Enter Qty Change, which is the difference to add or remove, not the desired final balance. If the record shows 10 and the verified count is 8, the change is −2. For an opening count of 10 from zero, the change is +10.
- Check Unit cost, choose Add Line, and review the total quantity and value change.
- Choose Save, review, then Post when approved. Check the resulting location balance and related GL batch.
Do not use an adjustment to receive a delivery that already has a PO receipt, or to move stock between warehouses; those have their own workflows.
Retail Price Maintenance
Use Retail Price Maintenance for controlled bulk changes to item selling prices. The screen is deliberately a preview-then-apply workflow so a broad pricing rule can be reviewed before it changes inventory master records.
Choose the item scope
Limit the preview by Item Type, Product Class, Beginning/Ending Item Number, and whether suspended items should be included. A narrow scope is safer when testing a new pricing rule.
Choose the price change
Select the pricing Method, enter its Value, choose the Rounding rule, and add a Memo that explains the reason for the change. Then choose Preview.
Review before applying
The preview grid shows the selected items and proposed price results. Apply Changes remains unavailable until a preview has been built. Review the affected item count and old/new prices before applying the batch.
Applied price changes are recorded as an auditable price-change batch with its scope, method, adjustment value, rounding rule, memo, changed-item count, and old/new item prices. Price-change history also supports identifying a later reversal where that workflow is used.
Inventory / Purchasing Reports
This page groups the Inventory / Purchasing reports together.
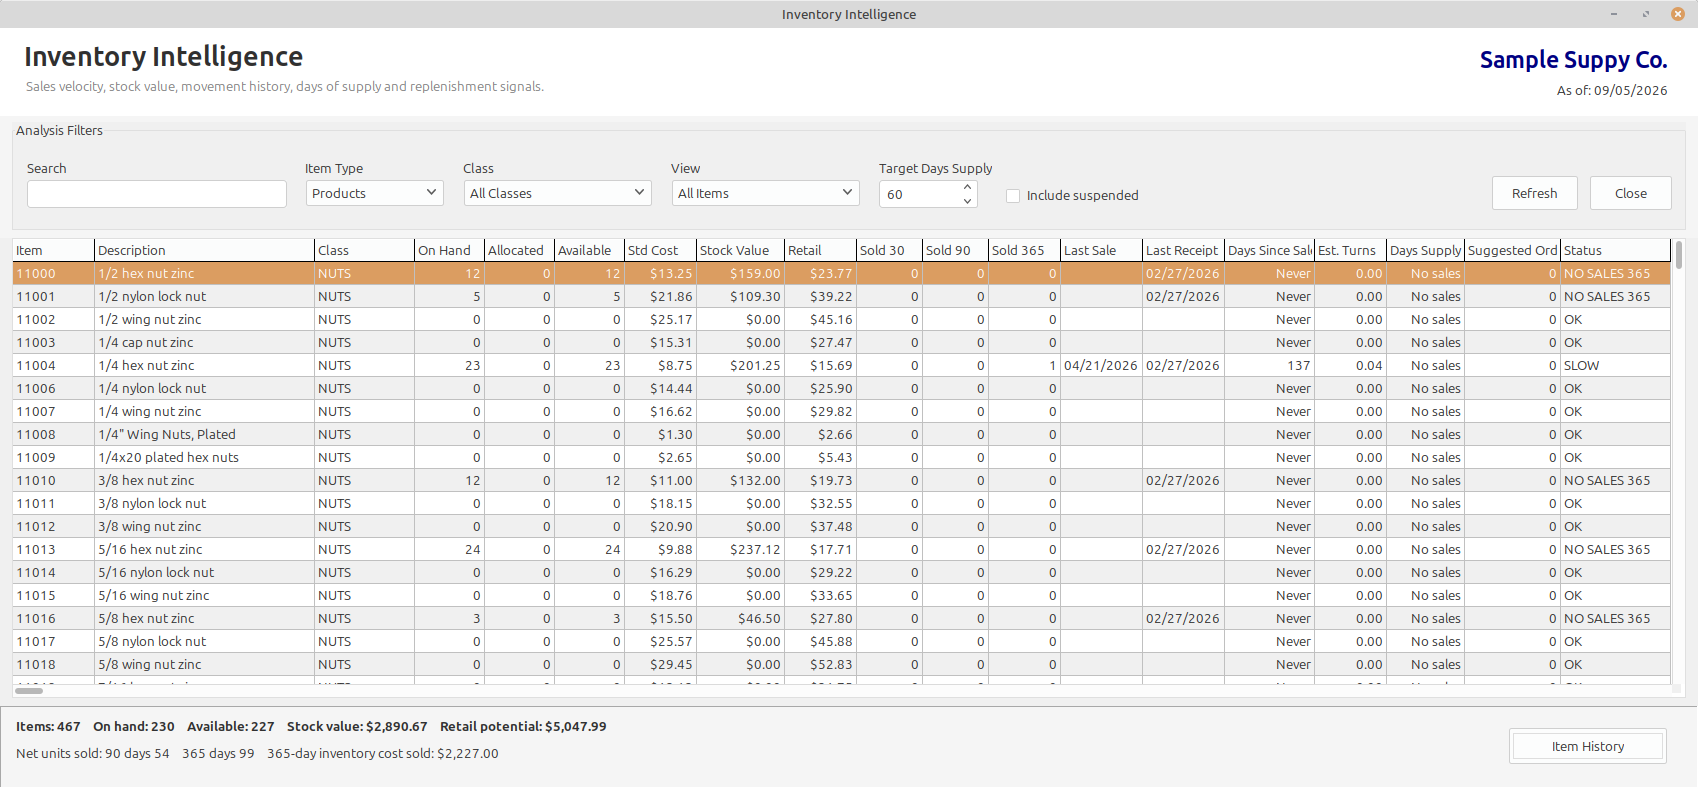
Inventory Report
The Inventory Report Center can produce an Item Summary or a By Location view. Use the selection controls to narrow by product class, location, item status, quantity condition, or search text, and choose the order that makes the report easiest to review. Available ordering includes item number, description, product class, location, on-hand quantity, and inventory value where applicable.
Inventory Analysis
When available from the Console, Inventory Analysis is the management view for current On Hand, Allocated and Available quantity, stock value, recent sales velocity, last sale/receipt, estimated turns, estimated days of supply, suggested order quantity, and operational status signals. Use it to identify slow-moving, overstocked, out-of-stock, reorder, or high-value items before changing purchasing or pricing decisions. Suggested Order is a planning signal, not a Purchase Order commitment; review open POs, vendor lead time, minimums and other purchasing facts before ordering.
Transfer Register
Lists posted inventory location transfers for a selected date range and optional From / To locations. It provides the audit trail for stock moved between locations, including item quantities, unit cost/value, and available reference information.
Inventory-to-GL Reconciliation
Compares the inventory subledger/value with the configured Inventory General Ledger control account. Use it to find differences between inventory transactions and posted GL inventory activity before month-end.
Which inventory report should I use?
| Question | Best starting point |
|---|---|
| What inventory do we have and what is it worth? | Inventory Report |
| Where is a particular item physically located? | Inventory Report — By Location |
| What items may need purchasing, pricing, or stocking attention? | Inventory Analysis |
| What stock moved from one location to another? | Transfer Register |
| Does inventory agree with the General Ledger? | Inventory-to-GL Reconciliation |
Back to Inventory / Purchasing Console | Back to Help contents
Job Costing: follow one project's income and costs
A job groups the activity for one piece of work, such as an installation, repair, or customer project. It helps you answer “What did we bill, what did this work cost, and what is left?”
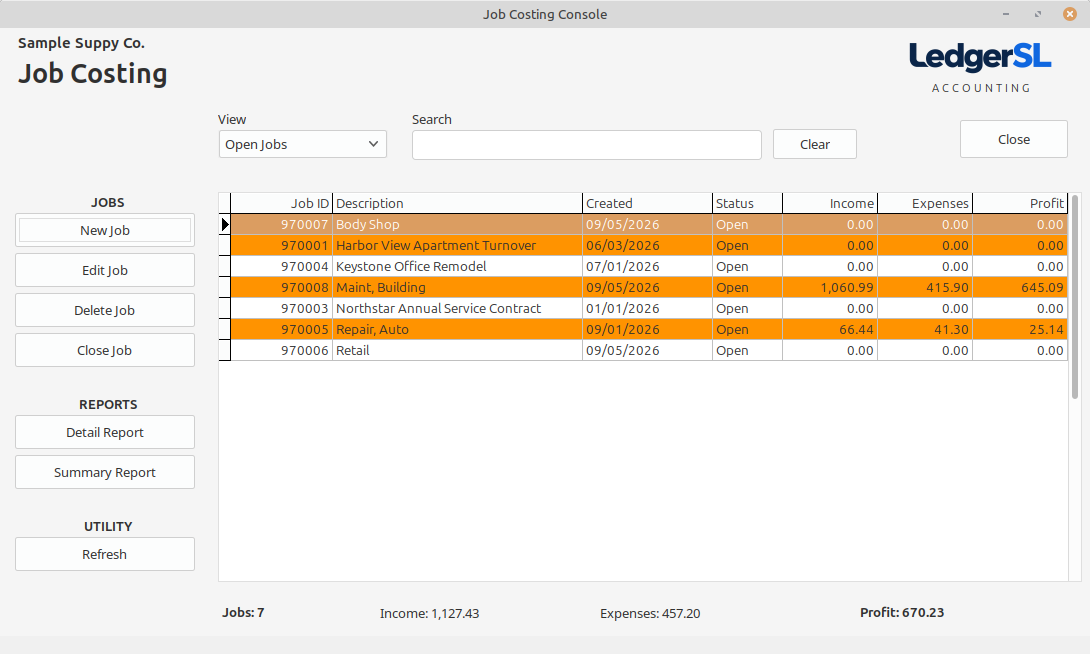
- Create the job before entering the related customer invoices.
- Use the same job on each relevant AR invoice and put its reference in related purchasing/bill descriptions.
- Review automatically recorded activity, then add only job costs that are missing from the job detail.
- Use Detail Report to check individual entries and Summary Report to compare jobs.
- Close the job when its work and final entries are complete; keep its history.
See Job Entry / Maintenance for a complete worked example and a reusable notes template. Job profit is based on recorded job activity; it is not the cash in your bank and is not proof that every customer has paid.
Job Entry / Maintenance: set up and track a job
1. Create the job before recording its activity
- Open Job Costing from the main accounting area or AR, then choose New Job.
- Enter a clear Description, for example Oak Street — shelf installation.
- Check Created. Leave Closed unchecked while the work is active.
- Enter the important information in Notes. The current form provides free-text notes rather than separate customer, site, budget, or deadline fields. Use the template below to keep the same information for every job.
- Choose Save. Ledger assigns the Job ID; note the actual ID and use it on related paperwork. The example description is not an ID you must type into a number field.
- Return to the job list and confirm that the new job is open and has the right description.
Example job notes
Customer: Oak Street Shop
Site: Rear stockroom,
Oak Street
Contact: Customer's site contact and preferred
number
Work agreed: Supply 10 shelves and complete one
installation visit
Customer PO / authorization: Customer
reference and approval date
Target date: Agreed installation
date
Agreed selling amount: 500.00 before applicable tax
Estimated direct costs:
Shelves 200.00; subcontract installation 80.00
Supplier / documents:
PO number, delivery note, supplier invoice number
Changes: Date,
requested change, approved price, who approved it
Progress / follow-up:
Delivery complete; installation booked; final invoice to check
These are entries in Notes, not additional controls or an automatic budget calculation. Update notes as the work changes. Keep actual financial amounts in the proper transaction or job-detail fields as explained below.
2. Connect sales and follow the recorded costs
- On the customer invoice, choose this job in Job before saving and posting.
- After AR posting, open the job and refresh/check its detail. Posted product and service sales contribute job income; recorded invoice cost of sales is included in job expenses.
- Put the same job ID/name in PO Memo for related purchase orders. The PO itself does not have a job selector and does not create a job cost.
- On an AP bill, select the optional job field if your edition provides it, and include the job and bill reference in the description. The LedgerSL edition covered here has that field; the LedgerPG AP entry covered here does not.
- Review the job before adding an AP-related cost. In the versions covered here, AP posting does not automatically create Job Detail expense rows, even when a Job value is stored on an AP distribution. Use the manual procedure below for an appropriate missing cost.
3. Enter a missing job expense manually
Example: the installation subcontractor bills 80.00. Record and post the actual supplier bill in AP for the company books. If that cost is not already included in the job totals, add a job-only tracking line:
- Select the job in Job Costing and choose Edit Job.
- In Detail Entry, enter the cost's Date.
- Enter Description, for example “Subcontract installation — vendor bill S-104; recorded in AP.” Include a reference you can trace.
- Select the appropriate GL Account, such as your approved subcontract expense category.
- Leave Income at 0 and enter Expense = 80.00. A manual detail row accepts either income or expense, not both, and does not accept negative amounts.
- Choose Add Line. Check the line in the detail grid and the revised totals.
- Choose Save for the job. Adding a row to the screen is not the final save of the job.
A manual job-detail line changes job tracking only. Selecting a GL Account here classifies the job line; saving the job does not create an AP invoice, pay a supplier, move stock, or create a GL batch. Keep the actual company transaction in its normal accounting workflow. Do not enter its income or cost twice in job detail.
4. Check the project's result
Using the invoice example, assume there is no tax, no service cost recorded on the invoice, and no other job activity.
| Recorded activity | Job income | Job expenses |
|---|---|---|
| 10 shelves sold at 35.00 | 350.00 | — |
| Installation sold at 150.00 | 150.00 | — |
| Recorded invoice cost of 10 shelves at 20.00 | — | 200.00 |
| Subcontract expense added once to job detail | — | 80.00 |
| Totals | 500.00 | 280.00 |
Job profit = 500.00 − 280.00 = 220.00. This is the result for the costs entered in this example, before any other overhead or missing costs. A customer payment settles an invoice; do not add that payment as a second job-income line.
5. Review, correct, and finish the job
- Choose Detail Report and compare the entries with the customer invoices, supplier bills, and your notes. Check dates and references, not just the final total.
- If income is missing, check that the AR invoice used the correct job and was posted. If cost is missing, check invoice cost of sales and manual job details before entering anything new.
- For an incorrect manual line, select it, correct the entry fields, use the update-line action, and save the job. Use Clear Line to reset the entry boxes when starting a new line. Do not alter source-generated values merely to make the profit look right.
- Check Summary Report to compare the income, expenses, and profit across jobs.
- After all work, final bills, and corrections are complete, close the job using Close Job or its Closed setting and date. Reopen the job through the Closed setting if more work is needed.
- Keep the job record. Delete Job removes history and is different from closing a completed job.
Job reports: check the details behind the result
- Open Job Costing and find the job by ID or description. Refresh the list after posting related activity.
- Choose Detail Report to review one job. Check its notes, dates, descriptions, income, and expense lines against your paperwork.
- Choose Summary Report to compare jobs. Check any open/closed or other report filters before deciding a job is missing.
- Calculate the expected result as Income minus Expenses. Investigate an unexpected amount by returning to the detail.
- Check customer payment status in AR and supplier payment status in AP. A job-profit report answers a different question from “Has everyone paid?”
For the worked example, the expected recorded result is Income 500.00, Expenses 280.00, Profit 220.00. If expenses show 480.00, look for the 200.00 stock cost being counted both from the customer invoice and as a manual line.
Contacts
Use Contacts for company/contact maintenance, groups, notes/history, and related follow-up activity.
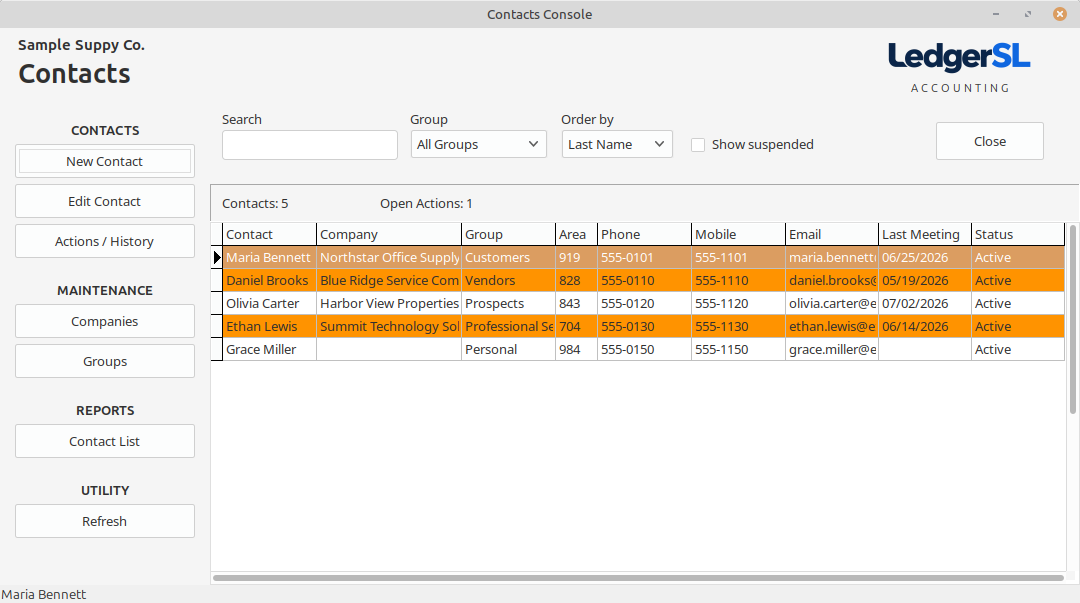
Contact Maintenance
Add and maintain individual contact records.
Contact Companies
Add and maintain company records used by the Contacts module.
Contact Groups
Contact Groups organize contacts into useful categories such as customers, vendors, prospects, professional services, or other company-defined groups. The Contacts Console can filter by group.
A group has a description and an Active/Suspended state. Suspending a group preserves the category for existing history while preventing it from being treated as a normal active choice where suspended groups are excluded.
Contact Actions / History
Actions / History records dated follow-up work for the selected contact. Each entry has a short description, date, status, and a longer description so planned work and completed results remain together in the contact record.
Action statuses
| Status | Typical meaning |
|---|---|
| Pending | Follow-up is planned and waiting to be completed. |
| Open | The action/opportunity is active. |
| Closed | The action is complete. |
| Cancelled | The planned action is no longer required. |
| Hold | Work is temporarily paused. |
| Won | The tracked opportunity or objective was successful. |
| Lost | The tracked opportunity or objective did not proceed. |
Contacts Reports
Contact List
Prints the contacts selected by the current Contacts Console filters. Set Search, Group, Order By, and Show Suspended first, review the grid, then print the Contact List. This makes the report match the working list you just prepared.
A practical period end review
Set a clear cutoff date and complete the source-module work before treating the GL reports as final. Use the same date and company scope when comparing balances.
- Review held, unprinted, and unposted invoices, receipts, and payments. Determine what belongs in the period and resolve the unfinished work.
- Check outstanding customer and supplier balances. Investigate unapplied or unusual amounts using the account histories.
- Review inventory receipts, adjustments, and transfers. Compare physical stock questions with the relevant dated movements.
- Review and post the related GL batches. Confirm their year, period, source, balance, and hold status.
- Complete bank and subledger reconciliations. Keep an explanation of any unresolved exception.
- Review the Trial Balance, Income Statement, and Balance Sheet. Retain the reports required by your company.
- Make a dated company backup, then use Period Control when the responsible person approves closing.
An AR or AP month-end checklist does not by itself close the GL period. A closed period and a completed bank reconciliation are separate controls.
AR Month-End Procedures
AR Month End is a review process. Its purpose is to make sure receivables are complete, posted, explainable, and reconciled before you move on.
- Review unposted, held, and unprinted AR documents.
- Review unposted customer payments.
- Review open invoices and available customer credits.
- Run AR Aging and investigate unusual old balances.
- Review sales-tax and customer activity as needed.
- Run AR-to-GL Reconciliation and resolve exceptions.
- Save or print the reports your company retains for month end.
AP Month-End Procedures
AP Month End is a review of outstanding liabilities and posting completeness.
- Finish or review unposted vendor invoices and credits.
- Review payments that are created but not posted.
- Resolve check-printing issues for check payments.
- Apply vendor credits where appropriate.
- Run AP Aging and review old or unusual balances.
- Run AP-to-GL Reconciliation and resolve exceptions.
- Retain the reports required by your company.
Accounting Period Control
Accounting Period Control shows the fiscal periods for a selected year and controls whether a period is open for accounting activity. The grid shows each period's name, start/end dates, status, and counts of posted, unposted, and held GL batches.
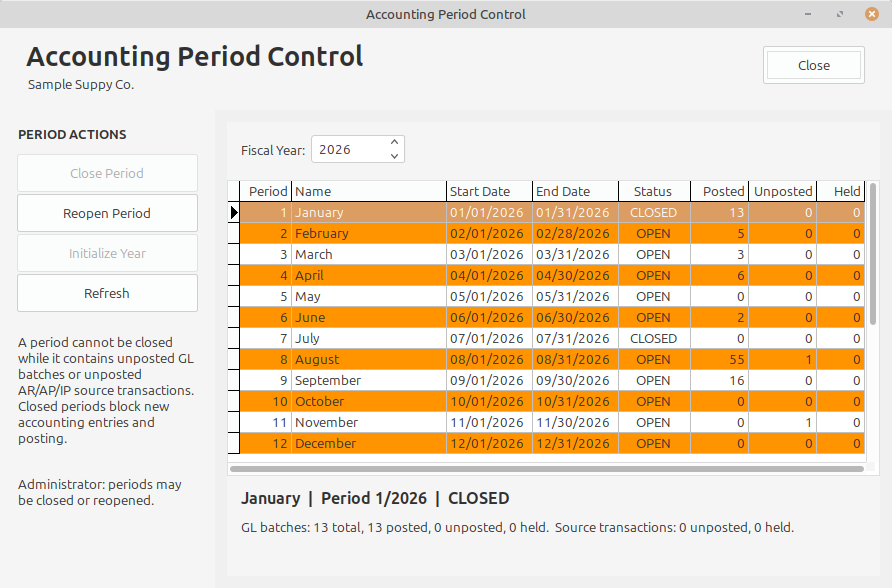
Period statuses
| Status | Meaning |
|---|---|
| Open | Normal accounting activity is permitted, subject to user permissions and normal transaction validation. |
| Closed | The period is closed to GL batch creation/posting until an authorized reopen is completed. |
| Locked | The period is unavailable for transaction changes/posting and must be reopened by an authorized administrator. |
Reviewing a period
Select the Fiscal Year, then select a period in the grid. Before closing a period, review the Posted, Unposted, and Held columns. Held batches count as unposted work because they have not yet reached the General Ledger totals.
Close Period
A period can be closed only when the user has the required permission and the selected period is currently open.
- Resolve or post all unposted GL batches in the period.
- Release, correct, or otherwise resolve all held batches.
- Review the appropriate subledger reconciliations and final reports.
- Select the period and choose Close Period.
Reopen Period
Reopening a period is an administrative exception. Administrator permission is required, and a nonblank reason is required so the change has an audit explanation. After reopening, make the necessary correction and repeat the normal review/close process.
Refresh
Choose Refresh after posting or resolving batches so the Posted, Unposted, Held, and status information reflects the current database state.
Back to General Ledger Console | GL Reports | Back to Help contents
Back up and recover company data
A company database contains your business records. Keep dated backups separate from the working file, particularly before an application update, major setup change, or period close. Keep more than one recovery point.
Use the LedgerSL company backup action
- Confirm the company name and active database path.
- Finish and save transaction edits.
- Choose Company > Back Up Company in a build that provides this action.
- Save a dated copy to a separate drive or other protected destination, and check the result shown by the application.
- Confirm the backup file exists. Periodically open a separate test copy and compare the company, recent records, and important reports.
Source Backup is different. It backs up programming files and is not a substitute for a company-database backup.
File-copy backup when the application is closed
If you use a file-copy procedure, close LedgerSL completely and make sure no other program has the company database open. Copy the data folder and accompanying files together to a dated destination. Preserve any journal or WAL files; do not delete them to clear a message. Do not copy a database in active use as though it were an ordinary document.
Test a recovery without replacing current work
- Keep the original backup and current company safe. Make a separate local test copy.
- Use a compatible LedgerSL version and select the test copy through Company > Change Company.
- Check the company name, last expected transaction, customer and supplier balances, and retained reports.
- Return to the intended working company before entering new activity. Keep one clearly identified working copy.
Restoring an older backup returns to the records in that copy. Transactions entered after its date must be accounted for. Do not overwrite the current database simply to see whether a backup works.
LedgerPG backup is a server task
Use PostgreSQL backup and restore procedures agreed with your administrator. A PostgreSQL database is not a single LedgerSL .db file. Record the database name, backup date, compatible server/application versions, destination, and result of a restore test. Test recovery into a separate database before replacing working data.
Troubleshooting
Source batch is not editable in GL
This is intentional for AR/AP/Inventory-generated batches. Correct the originating transaction in its source module.
Document is finalized but its GL batch is unposted
This is the normal two-stage review workflow. Open GL Console, review the released balanced batch, and post it there.
Posting account is not configured
Open Posting Account Setup and assign the required GL account before posting.
Check payment will not post
Confirm the check has been successfully printed or explicitly marked handwritten and has a valid recorded check number.
Check appears twice in Check Printing
Do not print both rows. One payment should produce one queue row. Keep the payment and bank references and contact support before printing or posting it.
Bank Reconciliation will not complete
The Difference must be zero. Review outstanding/cleared items, statement balances and dates, posting dates, duplicate/missing activity, and whether each transaction belongs to the selected bank.
Inventory would be posted twice
Receiving posts Inventory. The related PO-linked AP invoice should clear Received Not Invoiced rather than debit Inventory a second time.
F1 help does not open
Open the installed Help/index.html directly or use the online guide. If F1 does not open the expected topic, include the screen name and application build when contacting support.
Getting useful support
Begin with the exact screen and message. Check the company, date range, division, and status filters before concluding that a record is missing. If posting may already have succeeded, inspect the existing document and batch before repeating it.
In LedgerSL, Help > Support Information provides diagnostic details, including database and settings locations. Review these before sharing them.
- Application edition and version or build.
- Linux distribution and version.
- Screen name, action attempted, and exact error message.
- Whether the issue occurs in the sample company or your own company.
- A screenshot with private business details covered where needed.
Use the contact form at www.ledgersl.com. The form opens an email draft for you to send. Do not include passwords. For a feature request, describe the job you want to complete and the result you need.
Using and updating this help
Keep the installed help available so you can read it while offline. F1 opens a topic where help is connected in your application build; you can always open the installed Help/index.html directly.
When an updated help download is supplied for your edition/build, close the help tab, follow the included update instructions, and reopen Help to check the documentation date. A help-only update replaces the help files; it does not require replacing your company data.
The help file and website will be updated as more information becomes available and changes are made to the application. Check the website for newer documentation, and compare the documented version with the program you are running. The latest online guide is available at www.ledgersl.com/help. The downloaded guide also works offline.